DeepLearning_Tensorflow

本篇主要记录在日常工作中遇到的TensorFlow的相关信息,包括如何处理报错信息,环境设置,训练测试,数据等等。

如何安装

安装tensorflow或者ubunt时,优先使用清华镜像

地址:https://mirrors.tuna.tsinghua.edu.cn/help/tensorflow/

安装教程可以参考 https://www.tensorflow.org/install/source

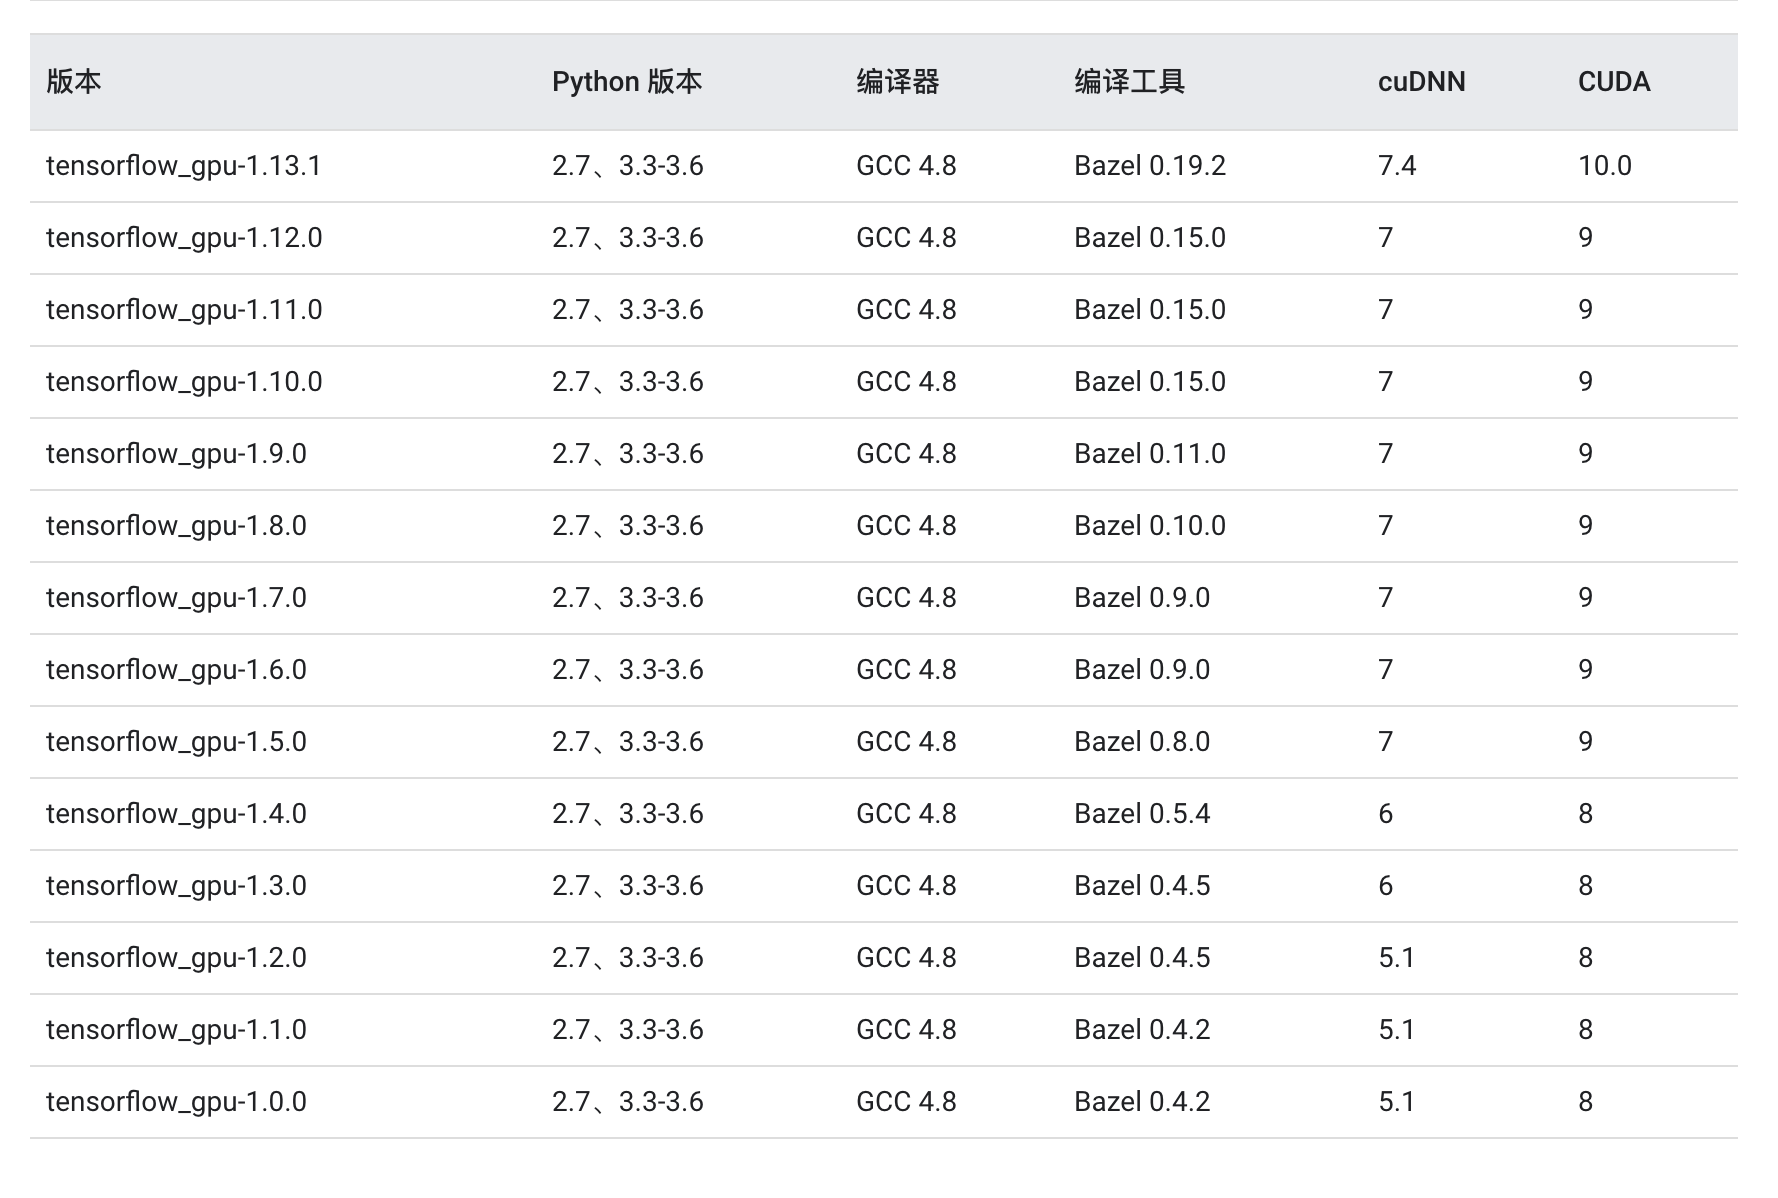
在安装GPU版本的时候,要安装对应的cuda和cudnn文件,详细信息可以参考NVIDIA的官网,对于CUDA 和TensorFlow-GPU的版本对照,

1. 安装pipeline

  1. 安装NVIDIA驱动

    使用nvidia-smi进行测试,如果没有该命令,需要安装,安装链接为https://www.nvidia.com/Download/index.aspx?lang=en-us ,如果已经安装,进入下一步

  2. 安装cuda

    1. 首先要查询想要安装的TensorFlow版本与cuda版本的对应关系,可以在此处查询https://www.tensorflow.org/install/source,另外,补充TensorFlow1.14.0 对应cuda10.0

    2. 确认好版本之后在此处进行下载https://developer.nvidia.com/cuda-toolkit-archive 以cuda10+linux为例,当安装的是debain版本时,选择14.04的版本,因为cuda是向下兼容的,这样可以避免出错,

    3. 推荐下载runfile的方式,安装方式如下

      1
      2
      3
      Installation Instructions:
      Run `sudo sh cuda_10.0.130_410.48_linux.run`
      Follow the command-line prompts
    4. 按照提示一步步进行安装即可,最后在.zshrc 或者.bashrc中加入cuda的路径

  3. 安装cudnn

    1. 下载地址https://developer.nvidia.com/rdp/cudnn-download

    2. 根据安装的cuda版本找到对应的cudnn版本,尽量选择runtime版本,下载完之后,进行安装

      1
      sudo dpkg -i xxx.deb
  4. 安装tensorflow

    1
    pip install tensorflow-gpu=1.14.0

API查询

https://www.tensorflow.org/overview?hl=zh_cn该网址保存着tensorflow的实例,操作手册和api查询

高质量仓库和博客

BLOG:

  1. 总览:https://www.tensorflow.org/overview
  2. 常用指令的用法:https://www.tensorflow.org/guide
  3. 常见模型:https://www.tensorflow.org/tutorials

GITHUB:

  1. 官方仓库:https://github.com/tensorflow/models/
  2. 高星仓库:https://github.com/aymericdamien/TensorFlow-Examples

报错信息及处理方案

CentOS安装TensorFlow:ImportError: /usr/lib64/libstdc++.so.6: version CXXABI_1.3.7’ not found

也有可能是这种信息,终端启动python,执行import tensorflow的操作出现的报错信息

1
2
3
4
5
6
7
8
9
10
11
12
13
14
15
16
(tf) shixiaofeng@n8-035-087:~$ python
Python 2.7.16 |Anaconda, Inc.| (default, Mar 14 2019, 21:00:58)
[GCC 7.3.0] on linux2
Type "help", "copyright", "credits" or "license" for more information.
>>> import tensorflow as tf
Traceback (most recent call last):
File "<stdin>", line 1, in <module>
File "/data00/home/shixiaofeng/anaconda2/envs/tf/lib/python2.7/site-packages/tensorflow/__init__.py", line 24, in <module>
from tensorflow.python import *
File "/data00/home/shixiaofeng/anaconda2/envs/tf/lib/python2.7/site-packages/tensorflow/python/__init__.py", line 52, in <module>
from tensorflow.core.framework.graph_pb2 import *
File "/data00/home/shixiaofeng/anaconda2/envs/tf/lib/python2.7/site-packages/tensorflow/core/framework/graph_pb2.py", line 6, in <module>
from google.protobuf import descriptor as _descriptor
File "/data00/home/shixiaofeng/anaconda2/envs/tf/lib/python2.7/site-packages/google/protobuf/descriptor.py", line 47, in <module>
from google.protobuf.pyext import _message
ImportError: /usr/lib/x86_64-linux-gnu/libstdc++.so.6: version `CXXABI_1.3.9' not found (required by /data00/home/shixiaofeng/anaconda2/envs/tf/lib/python2.7/site-packages/google/protobuf/pyext/_message.so)

遇到这种相关信息是因为动态库版本过低造成的。对于TensorFlow的model目前一般使用的是最低1.5版本,这就需要对TensorFlow进行编码的时候需要一定的动态库版本。

  • 处理方式:

    • 查看虚拟环境中的动态库版本,下面的代码是找到名称为tf的虚拟环境下的动态库版本
      1
      strings ~/anaconda2/envs/tf/lib/libstdc++.so.6 | grep 'CXXABI'
    • 查看系统的动态库版本
      1
      2
      3
      4
      strings /usr/lib/x86_64-linux-gnu/libstdc++.so.6 | grep 'CXXABI'
      strings
      或者
      /usr/lib64/libstdc++.so.6 | grep 'CXXABI'
    • 如果发现系统的动态库版本较低并且就如报错信息所言,不存在需要的动态库版本,并且虚拟环境中的动态库版本较高,这个时候将虚拟环境下的动态库文件复制到系统环境下
    1
    2
    3
    4
    5
    6
    7
    8
    9
    10
    # cd到系统路径
    cd /usr/lib/x86_64-linux-gnu
    # 或者
    cd /usr/lib64
    # 查询libstd++版本文件
    find . -name "libstdc++"
    # 复制动态库文件到系统目录
    sudo cp ~/anaconda2/envs/tf/lib/libstdc++.so.6.0.25 /usr/lib/x86_64-linux-gnu/
    # /usr/lib/x86_64-linux-gnu/目录下在创建软连接
    ln -snf ./libstdc++.so.6.0.25 ./libstdc++.so.6

查看tf在cpu还是gpu

激活环境

1
2
3
4
5
6
7
import numpy
import tensorflow as tf
a = tf.constant([1.0, 2.0, 3.0, 4.0, 5.0, 6.0], shape=[2, 3], name='a')
b = tf.constant([1.0, 2.0, 3.0, 4.0, 5.0, 6.0], shape=[3, 2], name='b')
c = tf.matmul(a, b)
sess = tf.Session(config=tf.ConfigProto(log_device_placement=True))
print sess.run(c)

会得到运行信息

1
2
3
4
5
6
7
8
9
10
11
12
13
14
15
16
17
18
19
20
21
22
23
24
25
26
27
28
29
30
31
32
33
34
35
36
37
38
39
40
41
42
43
44
45
46
47
2019-04-03 16:20:34.035168: I tensorflow/core/platform/cpu_feature_guard.cc:137] Your CPU supports instructions that this TensorFlow binary was not compiled to use: SSE4.1 SSE4.2 AVX AVX2 FMA
2019-04-03 16:20:34.833230: I tensorflow/core/common_runtime/gpu/gpu_device.cc:1030] Found device 0 with properties:
name: GeForce GTX 1080 Ti major: 6 minor: 1 memoryClockRate(GHz): 1.582
pciBusID: 0000:02:00.0
totalMemory: 10.92GiB freeMemory: 10.77GiB
2019-04-03 16:20:34.945989: I tensorflow/core/common_runtime/gpu/gpu_device.cc:1030] Found device 1 with properties:
name: GeForce GTX 1080 Ti major: 6 minor: 1 memoryClockRate(GHz): 1.582
pciBusID: 0000:03:00.0
totalMemory: 10.92GiB freeMemory: 10.77GiB
2019-04-03 16:20:35.058179: I tensorflow/core/common_runtime/gpu/gpu_device.cc:1030] Found device 2 with properties:
name: GeForce GTX 1080 Ti major: 6 minor: 1 memoryClockRate(GHz): 1.582
pciBusID: 0000:82:00.0
totalMemory: 10.92GiB freeMemory: 10.77GiB
2019-04-03 16:20:35.171617: I tensorflow/core/common_runtime/gpu/gpu_device.cc:1030] Found device 3 with properties:
name: GeForce GTX 1080 Ti major: 6 minor: 1 memoryClockRate(GHz): 1.582
pciBusID: 0000:83:00.0
totalMemory: 10.92GiB freeMemory: 10.77GiB
2019-04-03 16:20:35.173885: I tensorflow/core/common_runtime/gpu/gpu_device.cc:1045] Device peer to peer matrix
2019-04-03 16:20:35.173989: I tensorflow/core/common_runtime/gpu/gpu_device.cc:1051] DMA: 0 1 2 3
2019-04-03 16:20:35.174006: I tensorflow/core/common_runtime/gpu/gpu_device.cc:1061] 0: Y Y N N
2019-04-03 16:20:35.174017: I tensorflow/core/common_runtime/gpu/gpu_device.cc:1061] 1: Y Y N N
2019-04-03 16:20:35.174026: I tensorflow/core/common_runtime/gpu/gpu_device.cc:1061] 2: N N Y Y
2019-04-03 16:20:35.174036: I tensorflow/core/common_runtime/gpu/gpu_device.cc:1061] 3: N N Y Y
2019-04-03 16:20:35.174052: I tensorflow/core/common_runtime/gpu/gpu_device.cc:1120] Creating TensorFlow device (/device:GPU:0) -> (device: 0, name: GeForce GTX 1080 Ti, pci bus id: 0000:02:00.0, compute capability: 6.1)
2019-04-03 16:20:35.174065: I tensorflow/core/common_runtime/gpu/gpu_device.cc:1120] Creating TensorFlow device (/device:GPU:1) -> (device: 1, name: GeForce GTX 1080 Ti, pci bus id: 0000:03:00.0, compute capability: 6.1)
2019-04-03 16:20:35.174077: I tensorflow/core/common_runtime/gpu/gpu_device.cc:1120] Creating TensorFlow device (/device:GPU:2) -> (device: 2, name: GeForce GTX 1080 Ti, pci bus id: 0000:82:00.0, compute capability: 6.1)
2019-04-03 16:20:35.174088: I tensorflow/core/common_runtime/gpu/gpu_device.cc:1120] Creating TensorFlow device (/device:GPU:3) -> (device: 3, name: GeForce GTX 1080 Ti, pci bus id: 0000:83:00.0, compute capability: 6.1)
Device mapping:
/job:localhost/replica:0/task:0/device:GPU:0 -> device: 0, name: GeForce GTX 1080 Ti, pci bus id: 0000:02:00.0, compute capability: 6.1
/job:localhost/replica:0/task:0/device:GPU:1 -> device: 1, name: GeForce GTX 1080 Ti, pci bus id: 0000:03:00.0, compute capability: 6.1
/job:localhost/replica:0/task:0/device:GPU:2 -> device: 2, name: GeForce GTX 1080 Ti, pci bus id: 0000:82:00.0, compute capability: 6.1
/job:localhost/replica:0/task:0/device:GPU:3 -> device: 3, name: GeForce GTX 1080 Ti, pci bus id: 0000:83:00.0, compute capability: 6.1
2019-04-03 16:20:35.924911: I tensorflow/core/common_runtime/direct_session.cc:299] Device mapping:
/job:localhost/replica:0/task:0/device:GPU:0 -> device: 0, name: GeForce GTX 1080 Ti, pci bus id: 0000:02:00.0, compute capability: 6.1
/job:localhost/replica:0/task:0/device:GPU:1 -> device: 1, name: GeForce GTX 1080 Ti, pci bus id: 0000:03:00.0, compute capability: 6.1
/job:localhost/replica:0/task:0/device:GPU:2 -> device: 2, name: GeForce GTX 1080 Ti, pci bus id: 0000:82:00.0, compute capability: 6.1
/job:localhost/replica:0/task:0/device:GPU:3 -> device: 3, name: GeForce GTX 1080 Ti, pci bus id: 0000:83:00.0, compute capability: 6.1

>>> print sess.run(c)
MatMul: (MatMul): /job:localhost/replica:0/task:0/device:GPU:0
2019-04-03 16:20:38.192824: I tensorflow/core/common_runtime/placer.cc:874] MatMul: (MatMul)/job:localhost/replica:0/task:0/device:GPU:0
b: (Const): /job:localhost/replica:0/task:0/device:GPU:0
2019-04-03 16:20:38.192864: I tensorflow/core/common_runtime/placer.cc:874] b: (Const)/job:localhost/replica:0/task:0/device:GPU:0
a: (Const): /job:localhost/replica:0/task:0/device:GPU:0
2019-04-03 16:20:38.192885: I tensorflow/core/common_runtime/placer.cc:874] a: (Const)/job:localhost/replica:0/task:0/device:GPU:0
[[22. 28.]
[49. 64.]]

anaconda虚拟环境添加路径

如果是个人创建的环境,则目录为,针对的是anaconda2,当然要根据自己安装的anaconda版本确定路径。

1
~/anaconda2/envs/tf/lib/python2.7/site-packages

如果是base环境

1
~/anaconda2/lib/python2.7/site-packages

在目录下创建文件*.pth文件

1
vim add_path.pth

在文件下添加内容,如下针对的是对于目前本人使用的开发机

1
2
3
/data00/home/xxx/repos/toutiao/lib/
/data00/home/xxx/repos/toutiao/tools/rpc-tool
/data00/home/xxx/ow_package/Theano

如果想要cuda路径信息

1
2
3
# 添加cuda8路径
/usr/local/cuda-8.0/bin/
/usr/local/cuda-8.0/lib64

也可以直接添加到~/.bashrc

1
2
export PATH=/usr/local/cuda-8.0/bin/:$PATH
export LD_LIBRARY_PATH=/usr/local/cuda-8.0/lib64:$LD_LIBRARY_PATH

无法导入tensorflow

已经安装tensorflow,但是在import的时候会出现no module name tensorflow的错误信息

卸载tensorflow并重新安装

多GPU使用

Train

官方的参考链接

https://www.tensorflow.org/guide/using_gpu#using_multiple_gpus

https://www.tensorflow.org/alpha/guide/using_gpu?hl=zh_cn#using_multiple_gpus

官方代码,存在于tensorflow/model/

这个说的就是并行化,一般是模型并行化和数据并行化

  • 模型并行化:不同的gpu保存的模型不同,输入的数据相同,共同训练,可以认为是一种bagging,一般Deeplearning用的不多
  • 数据并行化:不同的gpu保存的模型是相同,输入的数据不同,共同训练,指定一个device来保存模型参数,分配给使用的gpu模型中,使用所有模型的平均梯度来进行参数更新,一般用的是这种方式。

使用Minist进行多GPU试验

1
2
3
4
5
6
7
8
9
10
11
12
13
14
15
16
17
18
19
20
21
22
23
24
25
26
27
28
29
30
31
32
33
34
35
36
37
38
39
40
41
42
43
44
45
46
47
48
49
50
51
52
53
54
55
56
57
58
59
60
61
62
63
64
65
66
67
68
69
70
71
72
73
74
75
76
77
78
79
80
81
82
83
84
85
86
87
88
89
90
91
92
93
94
95
96
97
98
99
100
101
102
103
104
105
106
107
108
109
110
111
112
113
114
115
116
117
118
119
120
121
122
123
124
125
126
127
128
129
130
131
132
133
134
135
136
137
138
139
140
141
142
143
144
145
import tensorflow as tf
import numpy as np
from tensorflow.contrib import slim
from tensorflow.examples.tutorials.mnist import input_data
# 读取minist数据集
mnist = input_data.read_data_sets("/tmp/mnist/", one_hot=True)

num_gpus = 2
num_steps = 1000
learning_rate = 0.001
batch_size = 1000
display_step = 10

num_input = 784
num_classes = 10

# 定义minist训练网络
def conv_net_with_layers(x,is_training,dropout = 0.75):
with tf.variable_scope("ConvNet", reuse=tf.AUTO_REUSE):
x = tf.reshape(x, [-1, 28, 28, 1])
x = tf.layers.conv2d(x, 12, 5, activation=tf.nn.relu)
x = tf.layers.max_pooling2d(x, 2, 2)
x = tf.layers.conv2d(x, 24, 3, activation=tf.nn.relu)
x = tf.layers.max_pooling2d(x, 2, 2)
x = tf.layers.flatten(x)
x = tf.layers.dense(x, 100)
x = tf.layers.dropout(x, rate=dropout, training=is_training)
out = tf.layers.dense(x, 10)
out = tf.nn.softmax(out) if not is_training else out
return out

def conv_net(x,is_training):
# "updates_collections": None is very import ,without will only get 0.10
batch_norm_params = {"is_training": is_training, "decay": 0.9, "updates_collections": None}
#,'variables_collections': [ tf.GraphKeys.TRAINABLE_VARIABLES ]
with slim.arg_scope([slim.conv2d, slim.fully_connected],
activation_fn=tf.nn.relu,
weights_initializer=tf.truncated_normal_initializer(mean=0.0, stddev=0.01),
weights_regularizer=slim.l2_regularizer(0.0005),
normalizer_fn=slim.batch_norm, normalizer_params=batch_norm_params):
with tf.variable_scope("ConvNet",reuse=tf.AUTO_REUSE):
x = tf.reshape(x, [-1, 28, 28, 1])
net = slim.conv2d(x, 6, [5,5], scope="conv_1")
net = slim.max_pool2d(net, [2, 2],scope="pool_1")
net = slim.conv2d(net, 12, [5,5], scope="conv_2")
net = slim.max_pool2d(net, [2, 2], scope="pool_2")
net = slim.flatten(net, scope="flatten")
net = slim.fully_connected(net, 100, scope="fc")
net = slim.dropout(net,is_training=is_training)
net = slim.fully_connected(net, num_classes, scope="prob", activation_fn=None,normalizer_fn=None)
return net

def average_gradients(tower_grads):
average_grads = []
for grad_and_vars in zip(*tower_grads):
grads = []
for g, _ in grad_and_vars:
expend_g = tf.expand_dims(g, 0)
grads.append(expend_g)
grad = tf.concat(grads, 0)
grad = tf.reduce_mean(grad, 0)
v = grad_and_vars[0][1]
grad_and_var = (grad, v)
average_grads.append(grad_and_var)
return average_grads


def train():
with tf.device("/cpu:0"):
# tower_grads变量保存在cpu中
global_step=tf.train.get_or_create_global_step()
tower_grads = []

X = tf.placeholder(tf.float32, [None, num_input])
Y = tf.placeholder(tf.float32, [None, num_classes])

opt = tf.train.AdamOptimizer(learning_rate)
with tf.variable_scope(tf.get_variable_scope()):
for i in range(2):
with tf.device("/gpu:%d" % i):
with tf.name_scope("tower_%d" % i):
# 数据并行,使用该数据在当前设备下计算预测值
_x = X[i * batch_size:(i + 1) * batch_size]
_y = Y[i * batch_size:(i + 1) * batch_size]
logits = conv_net(_x, True)
tf.get_variable_scope().reuse_variables()
loss = tf.reduce_mean(tf.nn.softmax_cross_entropy_with_logits(labels=_y, logits=logits))
# 根据当前模型的损失计算梯度
grads = opt.compute_gradients(loss)
# 将梯度保存在临时变量tower_grads中
tower_grads.append(grads)
# 使用第一个gpu进行验证,计算正确率
if i == 0:
logits_test = conv_net(_x, False)
correct_prediction = tf.equal(tf.argmax(logits_test, 1), tf.argmax(_y, 1))
accuracy = tf.reduce_mean(tf.cast(correct_prediction, tf.float32))
# 计算所有模型的平均梯度
grads = average_gradients(tower_grads)
# 对优化器赋予当前的平均梯度进行参数更新
train_op = opt.apply_gradients(grads)
with tf.Session() as sess:
sess.run(tf.global_variables_initializer())
for step in range(1, num_steps + 1):
# 假设模型中的batch为N,使用gpu数量为M,那么每次拿到的数据为M*N
# 每个模型中feed的数据量都是N
batch_x, batch_y = mnist.train.next_batch(batch_size * num_gpus)
sess.run(train_op, feed_dict={X: batch_x, Y: batch_y})
# 每10次计算一次正确率
if step % 10 == 0 or step == 1:
loss_value, acc = sess.run([loss, accuracy], feed_dict={X: batch_x, Y: batch_y})
print("Step:" + str(step) + ":" + str(loss_value) + " " + str(acc))
print("Done")
print("Testing Accuracy:",
np.mean([sess.run(accuracy, feed_dict={X: mnist.test.images[i:i + batch_size],
Y: mnist.test.labels[i:i + batch_size]}) for i in
range(0, len(mnist.test.images), batch_size)]))

# 使用单个gpu设备进行训练
def train_single():
X = tf.placeholder(tf.float32, [None, num_input])
Y = tf.placeholder(tf.float32, [None, num_classes])
logits=conv_net(X,True)
loss=tf.reduce_mean(tf.nn.softmax_cross_entropy_with_logits(labels=Y,logits=logits))
opt=tf.train.AdamOptimizer(learning_rate)
train_op=opt.minimize(loss)
logits_test=conv_net(X,False)
correct_prediction = tf.equal(tf.argmax(logits_test, 1), tf.argmax(Y, 1))
accuracy = tf.reduce_mean(tf.cast(correct_prediction, tf.float32))
with tf.Session() as sess:
sess.run(tf.global_variables_initializer())
for step in range(1,num_steps+1):
batch_x, batch_y = mnist.train.next_batch(batch_size)
sess.run(train_op,feed_dict={X:batch_x,Y:batch_y})
if step%display_step==0 or step==1:
loss_value,acc=sess.run([loss,accuracy],feed_dict={X:batch_x,Y:batch_y})
print("Step:" + str(step) + ":" + str(loss_value) + " " + str(acc))
print("Done")
print("Testing Accuracy:",np.mean([sess.run(accuracy, feed_dict={X: mnist.test.images[i:i + batch_size],
Y: mnist.test.labels[i:i + batch_size]}) for i in
range(0, len(mnist.test.images), batch_size)]))

if __name__ == "__main__":
#train_single()
train()

Eval && Inference

在验证和测试的时候,每次输入的数据是单个数据,一般情况下无法进行拆分,因此,单gpu运算。如果增加服务器来处理大量的访问请求,要调用tensorflow serving,多个gpu不熟相同的graph,由tensorflow serving来控制请求的队列。

GPU选择

在运行tensorflow gpu时候,如果机器上存在多块显卡,并且没有在代码中进行多gpu设置,最好只用一块gpu,在运行程序的时候,可以使用如下命令

1
CUDA_VISIBLE_DEVICES=0 python **.py

如此,之后使用第一块gpu进行计算。

当然也有其他的设置方法,可以在程序中设置TensorFlow的device环境。

TensorRT

install

https://zhuanlan.zhihu.com/p/88318324

https://tbr8.org/how-to-install-tensorrt-on-centos/

TfRecord

TensorFlow推荐使用tfrecord的数据格式。

read

write

将tfrecord中的数据读出,只读取一个epoch, 也就是不进行重复读取,该代码不是为了进行模型训练,只是单纯的读取tfrecord中的数据并保存本地

1
2
3
4
5
6
7
8
9
10
11
12
13
14
15
16
17
18
19
20
21
22
23
24
25
26
27
28
29
30
31
32
33
34
35
36
37
38
39
40
41
42
43
44
45
46
47

def tf2image(swd,data_path):
"""
swd: 读取的样本要保存的路径
data_path: tfrecord的路径 'xxx/xxx/*.tfrecord'格式
"""
# get tfrecords
data_files = tf.gfile.Glob(data_path)
print('data_files',data_files)

with tf.Session() as sess:
# generator
filename_queue = tf.train.string_input_producer(data_files,shuffle=False,num_epochs=1)
# get sample from tfrecod
reader = tf.TFRecordReader()
_, serialized_example = reader.read(filename_queue)
features = tf.parse_single_example(serialized_example,
features={
'image_data': tf.FixedLenFeature([], dtype=tf.string)})
image = tf.image.decode_jpeg(features['image_data'], channels=3)
image = tf.image.convert_image_dtype(image, tf.uint8)

count=0
sess.run(tf.initialize_local_variables())
sess.run(tf.initialize_all_variables())
# create queue
coord=tf.train.Coordinator()
# start queue
threads = tf.train.start_queue_runners(coord=coord)

try:

while not coord.should_stop():
single= sess.run(image)
img=Image.fromarray(single, 'RGB')
img.save(swd +'/'+ str(count) + '.jpg')
count += 1
if count % 100 == 0:
print ('Alreay run %d images' % count)
except tf.errors.OutOfRangeError:
# if the queue is empty, break
print('Done running')
finally:
coord.request_stop()
coord.join(threads)


Fintune

微调模型,一般指我们使用一些成型框架如VGG,GOOGLENET等,并在这个网络的基础上添加不同的网络训练层,以适应我们自己的任务。对于vgg等网络,一般是基于Imagenet预训练好的,因此我们没必要再重新从头训练,但是对于IMagenet是1000类,但是我们自己的任务很可能不是在这个数据集上进行的,为了快速训练模型,我们选用模型微调的方法。

加载一个预训练的模型,固定加载的这个模型的部分权重,只更新部分网络权重。

参考博客:https://blog.csdn.net/ying86615791/article/details/76215363

代码来源:tensorflow yolo3

1
2
3
4
5
6
7
8
9
10
11
12
13
14
15
16
17
18
19
20
21
22
23
24
25
26
27
28
29
30
31
32
33
34
35
36
37
38
39
40
41
42
43
44
45
46
47
48
49
50
51
52
53
54
55
56
57
58
59
60
61
62
63
64
65
66
67
68
69
70
71
72
73
74
75
# 训练数据集
trainset = dataset(parser, train_tfrecord, BATCH_SIZE, shuffle=SHUFFLE_SIZE)
testset = dataset(parser, test_tfrecord, BATCH_SIZE, shuffle=None)

is_training = tf.placeholder(tf.bool)
example = tf.cond(is_training, lambda: trainset.get_next(), lambda: testset.get_next())

images = example[0]
y_true = example[1:]
# 整个模型结构
model = yolov3.yolov3(NUM_CLASSES, ANCHORS)
with tf.variable_scope('yolov3'):
# pred_feature_map contains three detection feature maps
pred_feature_map = model.forward(images, is_training=is_training)
loss = model.compute_loss(pred_feature_map, y_true)
y_pred = model.predict(pred_feature_map)
# 此时graph中保存着整个网络的全部节点
graph = tf.get_default_graph()

tf.summary.scalar("loss/coord_loss", loss[1])
tf.summary.scalar("loss/sizes_loss", loss[2])
tf.summary.scalar("loss/confs_loss", loss[3])
tf.summary.scalar("loss/class_loss", loss[4])

global_step = tf.Variable(0, trainable=False, collections=[tf.GraphKeys.LOCAL_VARIABLES])
write_op = tf.summary.merge_all()
writer_train = tf.summary.FileWriter("./checkpoint/summary/train")
writer_test = tf.summary.FileWriter("./checkpoint/summary/test")

# 要恢复的权重参数
saver_to_restore = tf.train.Saver(var_list=tf.contrib.framework.get_variables_to_restore(
include=["yolov3/darknet-53"]))
# 要更新的网络参数
update_vars = tf.contrib.framework.get_variables_to_restore(include=["yolov3/yolo-v3"])
learning_rate = tf.train.exponential_decay(
LR, global_step, decay_steps=DECAY_STEPS, decay_rate=DECAY_RATE, staircase=True)
optimizer = tf.train.AdamOptimizer(learning_rate)

# 只更新update_vars网络参数
update_ops = tf.get_collection(tf.GraphKeys.UPDATE_OPS)
with tf.control_dependencies(update_ops):
train_op = optimizer.minimize(loss[0], var_list=update_vars, global_step=global_step)

# 整个模型的saver
saver = tf.train.Saver(max_to_keep=2)
# sess中的graph为整个模型的graph,很重要,这里如果不指定graph,那么sess的默认graph不会保留saver_to_restore中的节点
sess = tf.Session(config=config,graph=graph)

sess.run([tf.global_variables_initializer(), tf.local_variables_initializer()])

# 加载的权重文件位置
ckpt = tf.train.get_checkpoint_state("./checkpoint/ckpt")
saver_to_restore.restore(sess, ckpt.model_checkpoint_path)

stem = os.path.splitext(os.path.basename(ckpt.model_checkpoint_path))[-1]
restore_iter = int(stem.split('-')[-1])

# 在tensorboard中显示graph
writer_train.add_graph(sess.graph)

print 'resotre iter:', restore_iter

for step in range(restore_iter, STEPS):
run_items = sess.run([train_op, write_op, y_pred, y_true] + loss, feed_dict={is_training: True})
# 验证步数
if (step+1) % EVAL_INTERNAL == 0:
# calculate recall and precision
train_rec_value, train_prec_value = utils.evaluate(run_items[2], run_items[3])

writer_train.add_summary(run_items[1], global_step=step)
writer_train.flush() # Flushes the event file to disk
# 保存网络权重
if (step+1) % SAVE_INTERNAL == 0:
saver.save(sess, save_path="./checkpoint/ckpt/yolov3.ckpt", global_step=step + 1)

Export Graph

参考文章:

https://blog.metaflow.fr/tensorflow-how-to-freeze-a-model-and-serve-it-with-a-python-api-d4f3596b3adc

https://blog.csdn.net/guyuealian/article/details/82218092

当训练好模型之后,默认会得到一些训练的权重文件

  • checkpoint文件保存着模型文件的路径
  • model.ckpt.meta保存了TensorFlow计算图的结构信息
  • model.ckpt保存每个变量的取值,此处文件名的写入方式会因不同参数的设置而不同,加载restore时的文件路径名是以checkpoint文件中的“model_checkpoint_path”值决定的

在ckpt文件夹下面,存储着的信息包含着整个模型的全部信息,这些信息很显然是可以进行模型的重新加载的,但是有一些信息是没必要的,尤其是在进行测试阶段的时候,在inference的时候,只需要加载已经训练好的权重参数即可,该阶段只有正向传播,没有反向传播过程,只需要告诉模型如何输入如何输出即可,不再需要想训练阶段那样要进行模型初始化,模型保存,优化参数等设置。在tensorflow中推荐将模型进行固化的方式,只保留模型的参数。

具体实现代码为

1
2
3
4
5
6
7
8
9
10
11
12
13
14
15
16
17
18
19
20
21
22
23
24
25
26
27
28
29
30
31
32
33
34
35
36
37
38
39
40
41
42
43
44
45
46
47
48
49
50
51
52
53
54
55
56
57
58
59
60
61
62
63
64
65
66
67
68
69
import os, argparse

import tensorflow as tf

# The original freeze_graph function
# from tensorflow.python.tools.freeze_graph import freeze_graph

dir = os.path.dirname(os.path.realpath(__file__))

def freeze_graph(model_dir, output_node_names):
"""Extract the sub graph defined by the output nodes and convert
all its variables into constant
Args:
model_dir: the root folder containing the checkpoint state file
output_node_names: a string, containing all the output node's names,
comma separated
"""
if not tf.gfile.Exists(model_dir):
raise AssertionError(
"Export directory doesn't exists. Please specify an export "
"directory: %s" % model_dir)

if not output_node_names:
print("You need to supply the name of a node to --output_node_names.")
return -1

# We retrieve our checkpoint fullpath
checkpoint = tf.train.get_checkpoint_state(model_dir)
input_checkpoint = checkpoint.model_checkpoint_path

# We precise the file fullname of our freezed graph
absolute_model_dir = "/".join(input_checkpoint.split('/')[:-1])
output_graph = absolute_model_dir + "/frozen_model.pb"

# We clear devices to allow TensorFlow to control on which device it will load operations
# if have cpu and gpu, we can load this graph on each device
clear_devices = True
# We import the meta graph in the current default Graph
saver = tf.train.import_meta_graph(input_checkpoint + '.meta', clear_devices=clear_devices)
# We start a session using a temporary fresh Graph
graph=tf.get_default_graph()

with tf.Session(graph=graph) as sess:
# 模型初始化
sess.run(tf.global_variables_initializer())
# We restore the weights
saver.restore(sess, input_checkpoint)

# We use a built-in TF helper to export variables to constants
output_graph_def = tf.graph_util.convert_variables_to_constants(
sess, # The session is used to retrieve the weights
graph.as_graph_def(), # The graph_def is used to retrieve the nodes
output_node_names.split(",") # The output node names are used to select the usefull nodes
)

# Finally we serialize and dump the output graph to the filesystem
with tf.gfile.GFile(output_graph, "wb") as f:
f.write(output_graph_def.SerializeToString())
print("%d ops in the final graph." % len(output_graph_def.node))

return output_graph_def

if __name__ == '__main__':
parser = argparse.ArgumentParser()
parser.add_argument("--model_dir", type=str, default="", help="Model folder to export")
parser.add_argument("--output_node_names", type=str, default="", help="The name of the output nodes, comma separated.")
args = parser.parse_args()

freeze_graph(args.model_dir, args.output_node_names)

上述代码可以完成将ckpt中文件的固化,并输出frozen_model.pb文件,该文件中保存着模型的参数。

那么如何加载已经固化的文件呢?代码如下

1
2
3
4
5
6
7
8
9
10
11
12
13
14
15
import tensorflow as tf

def load_graph(frozen_graph_filename):
# We load the protobuf file from the disk and parse it to retrieve the
# unserialized graph_def
with tf.gfile.GFile(frozen_graph_filename, "rb") as f:
graph_def = tf.GraphDef()
graph_def.ParseFromString(f.read())

# Then, we import the graph_def into a new Graph and returns it
with tf.Graph().as_default() as graph:
# The name var will prefix every op/nodes in your graph
# Since we load everything in a new graph, this is not needed
tf.import_graph_def(graph_def, name="prefix")
return graph

加载*.pb文件并返回模型的graph

下载数据集COCO&VOC

  • VOC数据集地址

    1
    2
    3
    wget http://host.robots.ox.ac.uk/pascal/VOC/voc2007/VOCtrainval_06-Nov-2007.tar
    wget http://host.robots.ox.ac.uk/pascal/VOC/voc2012/VOCtrainval_11-May-2012.tar
    wget http://host.robots.ox.ac.uk/pascal/VOC/voc2007/VOCtest_06-Nov-2007.tar
  • COCO数据集

    1
    2
    3
    4
    wget http://images.cocodataset.org/zips/train2017.zip
    wget http://images.cocodataset.org/annotations/annotations_trainval2017.zip
    wget http://images.cocodataset.org/zips/test2017.zip
    wget http://images.cocodataset.org/annotations/image_info_test2017.zip
  • 代码实现

    Reference from tensorflow model

1
2
3
4
5
6
7
8
9
10
11
12
13
14
15
16
17
18
19
20
#! /usr/bin/env python
# coding=utf-8

import six.moves.urllib as urllib
import tarfile
import zipfile

MODEL_NAME='ssd_mobilenet_v2_oid_v4_2018_12_12'
MODEL_FILE = MODEL_NAME + '.tar.gz'
DOWNLOAD_BASE = 'http://download.tensorflow.org/models/object_detection/'
print 'model name is:', MODEL_FILE
# Path to frozen detection graph. This is the actual model that is used for the object detection.
opener = urllib.request.URLopener()
opener.retrieve(DOWNLOAD_BASE + MODEL_FILE, MODEL_FILE)
tar_file = tarfile.open(MODEL_FILE)
for file in tar_file.getmembers():
file_name = os.path.basename(file.name)
if 'frozen_inference_graph.pb' in file_name:
tar_file.extract(file, os.getcwd())

Use the wget

1
2
3
4
5
6
7
8
9
10
11
12
13
14
15
16
17
18
19
20
21
22
23
24
25
26
27
28
29
30
31
32
33
34
35
36
37
38
39
40
41
42
43
44
45
46
47
48
49
50
51
52
53
54
55
56
57
58
59
60
61
62
63
64
65
66
67
68
69
70
71
72
73
74
75
76
77
78
79
80
81
82
83
84
85
86
87
88
89
90
#! /usr/bin/env python
# coding=utf-8

import zipfile
import tarfile
import time
import wget
import sys
import os
import argparse

# VOC urls
"""
wget http://host.robots.ox.ac.uk/pascal/VOC/voc2007/VOCtrainval_06-Nov-2007.tar
wget http://host.robots.ox.ac.uk/pascal/VOC/voc2012/VOCtrainval_11-May-2012.tar
wget http://host.robots.ox.ac.uk/pascal/VOC/voc2007/VOCtest_06-Nov-2007.tar
"""

# COCO urls
"""
wget http://images.cocodataset.org/zips/train2017.zip
wget http://images.cocodataset.org/annotations/annotations_trainval2017.zip
wget http://images.cocodataset.org/zips/test2017.zip
wget http://images.cocodataset.org/annotations/image_info_test2017.zip
"""


class parser(argparse.ArgumentParser):

def __init__(self, description):
super(parser, self).__init__(description)

self.add_argument(
"--dataset", "-data", default='voc', type=str, choices={'voc', 'coco'},
help="[default: %(default)s] The type of dataset ..."
)


voc_url = ['http://host.robots.ox.ac.uk/pascal/VOC/voc2007/VOCtrainval_06-Nov-2007.tar',
'http://host.robots.ox.ac.uk/pascal/VOC/voc2012/VOCtrainval_11-May-2012.tar',
'http://host.robots.ox.ac.uk/pascal/VOC/voc2007/VOCtest_06-Nov-2007.tar']

coco_url = ['http://images.cocodataset.org/zips/train2017.zip',
'http://images.cocodataset.org/annotations/annotations_trainval2017.zip',
'http://images.cocodataset.org/zips/test2017.zip',
'http://images.cocodataset.org/annotations/image_info_test2017.zip']


def main(args):
flags = parser(description="Download dataset").parse_args()
if flags.dataset == 'voc':
saved_path = [os.path.join('/data00/home/shixiaofeng/data', 'voc')]
urls = voc_url
elif flags.dataset == 'coco':
saved_path = [os.path.join('/data00/home/shixiaofeng/data', 'coco')]
urls = coco_url
else:
saved_path = [os.path.join('/data00/home/shixiaofeng/data', 'voc'),
os.path.join('/data00/home/shixiaofeng/data', 'coco')]
urls = [voc_url, coco_url]
for _path in saved_path:
if not os.path.exists(_path):
os.makedirs(_path)
for _path in saved_path:
for url in urls:
DATA_NAME = url.split('/')[-1]
print 'Downloading %s' % DATA_NAME
DATA_FILE = os.path.join(_path, DATA_NAME)
print 'Download the file to : %s' %DATA_FILE
wget.download(url, DATA_FILE)
try:
if url.split('.')[-1] == 'tar':
tar_file = tarfile.open(DATA_FILE)
for file_name in tar_file.getnames():
tar_file.extract(file_name, _path)
tar_file.close()

elif url.split('.')[-1] == 'zip':
zip_file = zipfile.ZipFile(DATA_FILE)
for file_name in zip_file.namelist():
zip_file.extract(file_name, _path)
zip_file.close()

except Exception as e:
print e


if __name__ == "__main__":
main(sys.argv[1:])

直接执行

1
python xxx.py --dataset coco 

可以直接下载coco数据集到设置的位置,并将数据集解压缩

OpenImage 下载

由于OpenImage文件较多,单次下载非常慢,特此保存一个下载脚本,输入想要的模型名称,下载openimage中对应的数据图片和标注信息

1
2
3
4
5
6
7
8
9
10
11
12
13
14
15
16
17
18
19
20
21
22
23
24
25
26
27
28
29
30
31
32
33
34
35
36
37
38
39
40
41
42
43
44
45
46
47
48
49
50
51
52
53
54
55
56
57
58
59
60
61
62
63
64
65
66
67
68
69
70
71
72
73
74
75
76
77
78
79
80
81
82
83
84
85
86
87
88
89
90
91
92
93
94
95
96
97
98
99
100
101
102
103
104
105
106
107
108
109
110
111
112
113
114
115
116
117
118
119
120
121
122
123
124
125
126
127
128
129
130
131
132
133
134
135
136
137
138
139
140
141
142
143
144
145
146
147
148
149
150
151
152
153
154
155
156
157
158
159
160
161
162
163
164
165
166
167
168
169
170
171
172
173
174
175
176
177
178
179
180
181
182
183
184
185
186
187
188
189
190
191
192
193
194
195
196
197
198
199
200
import time
import boto3
from botocore import UNSIGNED
from botocore.config import Config
import botocore
import logging
from multiprocessing import Pool, Manager
import pandas as pd
import os
import argparse
import sys
import functools
from urllib import request


s3 = boto3.client('s3', config=Config(signature_version=UNSIGNED))


def download(bucket, root, retry, counter, lock, path):
i = 0
src = path
dest = "{root}/{path}".format(root=root, path=path)
while i < retry:
try:
if not os.path.exists(dest):
s3.download_file(bucket, src, dest)
else:
logging.info("{dest} already exists.".format(dest=dest))
with lock:
counter.value += 1
if counter.value % 100 == 0:
logging.warning("Downloaded {} images: {}".format(counter.value,dest))
return
except botocore.exceptions.ClientError as e:
if e.response['Error']['Code'] == "404":
logging.warning("The file s3://{bucket}/{src} does not exist.".format(bucket=bucket,src=src))
return
i += 1
logging.warning("Sleep {i} and try again.".format(i))
time.sleep(i)
logging.warning("Failed to download the file s3://{bucket}/{src}. Exception: {e}".format(bucket=bucket,src=src,e=e))


def batch_download(bucket, file_paths, root, num_workers=10, retry=10):
with Pool(num_workers) as p:
m = Manager()
counter = m.Value('i', 0)
lock = m.Lock()
download_ = functools.partial(download, bucket, root, retry, counter, lock)
p.map(download_, file_paths)


def http_download(url, path):
with request.urlopen(url) as f:
with open(path, "wb") as fout:
buf = f.read(1024)
while buf:
fout.write(buf)
buf = f.read(1024)


def log_counts(values):
for k, count in values.value_counts().iteritems():
logging.warning("{}: {}/{} = {:.8f}.".format(k,count,len(values),count/len(values)))


def parse_args():
parser = argparse.ArgumentParser(
description='Dowload open image dataset by class.')

parser.add_argument("--root", type=str,
help='The root directory that you want to store the open image data.')
parser.add_argument("include_depiction", action="store_true",
help="Do you want to include drawings or depictions?")
parser.add_argument("--class_names", type=str,
help="the classes you want to download.")
parser.add_argument("--class_names_file", type=str,
help="the classes you want to download.")
parser.add_argument("--num_workers", type=int, default=10,
help="the classes you want to download.")
parser.add_argument("--retry", type=int, default=10,
help="retry times when downloading.")
parser.add_argument("--filter_file", type=str, default="",
help="This file specifies the image ids you want to exclude.")
parser.add_argument('--remove_overlapped', action='store_true',
help="Remove single boxes covered by group boxes.")
return parser.parse_args()


if __name__ == '__main__':
logging.basicConfig(stream=sys.stdout, level=logging.WARNING,
format='%(asctime)s - %(name)s - %(message)s')

args = parse_args()
bucket = "open-images-dataset"
names = [e.strip() for e in args.class_names.split(",")]
class_names = []
group_filters = []
percentages = []
for name in names:
t = name.split(":")
class_names.append(t[0].strip())
if len(t) >= 2 and t[1].strip():
group_filters.append(t[1].strip())
else:
group_filters.append("")
if len(t) >= 3 and t[2].strip():
percentages.append(float(t[2].strip()))
else:
percentages.append(1.0)

if not os.path.exists(args.root):
os.makedirs(args.root)

excluded_images = set()
if args.filter_file:
for line in open(args.filter_file):
img_id = line.strip()
if not img_id:
continue
excluded_images.add(img_id)

class_description_file = os.path.join(args.root, "class-descriptions-boxable.csv")
if not os.path.exists(class_description_file):
url = "https://storage.googleapis.com/openimages/2018_04/class-descriptions-boxable.csv"
logging.warning("Download {url}.".format(url=url))
http_download(url, class_description_file)

class_descriptions = pd.read_csv(class_description_file,
names=["id", "ClassName"])

class_names=[]
for line in open(args.class_names_file, 'r').readlines():
x=line.strip().split('/')
x = [i.capitalize() for i in x]
class_names.extend(x)

class_names = list(set(class_names))

class_descriptions = class_descriptions[class_descriptions['ClassName'].isin(class_names)]
print('class_descriptions',class_descriptions)
image_files = []
for dataset_type in ["train", "validation", "test"]:
image_dir = os.path.join(args.root, dataset_type)
os.makedirs(image_dir, exist_ok=True)

annotation_file = "{}/{}-annotations-bbox.csv".format(args.root,dataset_type)
if not os.path.exists(annotation_file):
url = "https://storage.googleapis.com/openimages/2018_04/{}/{}-annotations-bbox.csv".format(dataset_type,dataset_type)
logging.warning("Download {url}.".format(url=url))
http_download(url, annotation_file)
logging.warning("Read annotation file {}".format(annotation_file))
annotations = pd.read_csv(annotation_file)
annotations = pd.merge(annotations, class_descriptions,
left_on="LabelName", right_on="id",
how="inner")
if not args.include_depiction:
annotations = annotations.loc[annotations['IsDepiction'] != 1, :]

filtered = []
print("class_names", class_names)
group_filters = ['~group'] * len(class_names)
percentages=[1.0]*len(class_names)
for class_name, group_filter, percentage in zip(class_names, group_filters, percentages):
sub = annotations.loc[annotations['ClassName'] == class_name, :]
excluded_images |= set(sub['ImageID'].sample(frac=1 - percentage))

if group_filter == '~group':
excluded_images |= set(sub.loc[sub['IsGroupOf'] == 1, 'ImageID'])
elif group_filter == 'group':
excluded_images |= set(sub.loc[sub['IsGroupOf'] == 0, 'ImageID'])
filtered.append(sub)

print("annotations", annotations.shape)
print("filtered",len(filtered))
annotations = pd.concat(filtered)
annotations = annotations.loc[~annotations['ImageID'].isin(excluded_images), :]

if args.remove_overlapped:
images_with_group = annotations.loc[annotations['IsGroupOf'] == 1, 'ImageID']
annotations = annotations.loc[~(annotations['ImageID'].isin(set(images_with_group)) & (annotations['IsGroupOf'] == 0)), :]
annotations = annotations.sample(frac=1.0)

logging.warning("{} bounding boxes size: {}".format(dataset_type,annotations.shape[0]))
logging.warning("Approximate Image Stats: ")
log_counts(annotations.drop_duplicates(["ImageID", "ClassName"])["ClassName"])
logging.warning("Label distribution: ")
log_counts(annotations['ClassName'])

logging.warning("Shuffle dataset.")

sub_annotation_file = "{}/sub-{}-annotations-bbox.csv".format(args.root,dataset_type)
logging.warning("Save {} data to {}.".format(dataset_type,sub_annotation_file))
annotations.to_csv(sub_annotation_file, index=False)
image_files.extend("{}/{}.jpg".format(dataset_type, ids) for ids in set(annotations['ImageID']))
print('image_files',len(image_files))
logging.warning("Start downloading {} images.".format(len(image_files)))
batch_download(bucket, image_files, args.root, args.num_workers, args.retry)
logging.warning("Task Done.")

可以使用如下方法进行下载

1
python open_images_downloader.py --root ~/datas/openimage  --class_names_file dataset/awesome_open.names  --num_workers 500
赏杯咖啡!