本篇主要介绍使用hexo+Github进行个人博客的搭建,并实现通过个人域名进行网址访问。使用环境为Mac。
Preparation
三个必备条件:
- Github
- Hexo
- 个人域名
Github
对于绝大部分人来说都有github账号并且在个人电脑配置了ssh,如未满足该条件请参考右侧链接👉👉
1,下载Git installer,地址;http://git-scm.com/downloads
2,下载之后打开,双击.pkg安装
[也可以通过brew install git 进行git的安装]
3, 打开终端,使用git –version或者which git命令查看安装版本,有就是安装成功了
4,创建一个全局用户名、全局邮箱
git config –global user.name “xxx”
git config –global user.email “xxx.163.com”
此时打开会生成文件
~/.gitconfig内部保存git配置信息5、安装成功后打开终端
cd ~进入根目录输入命令ssh-keygen生成ssh-key,如果有提示,一直按回车
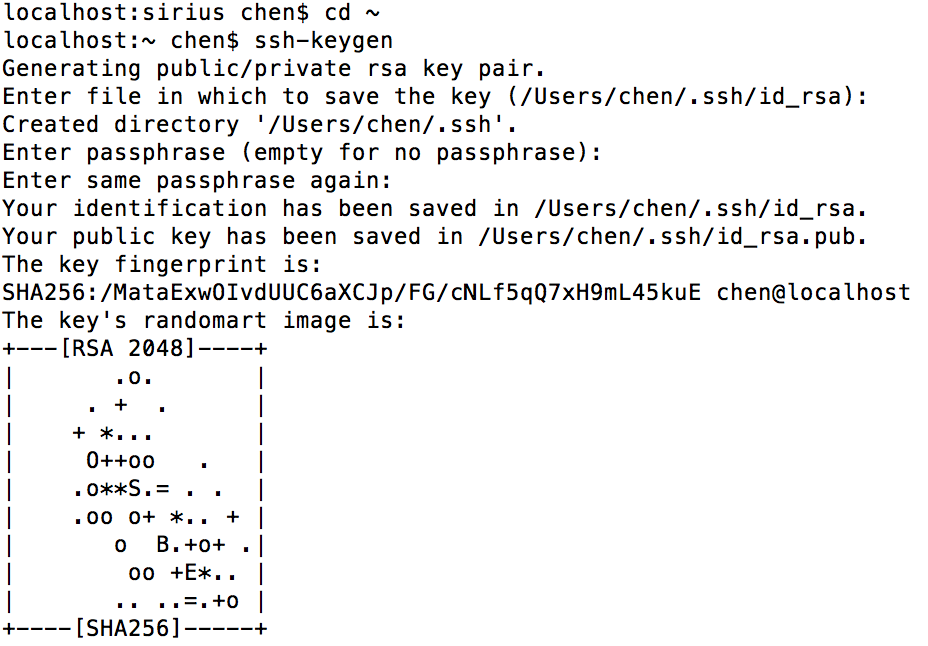
6、将SSH key添加到GitHub。登录到GitHub页面,Account Settings->SSH Public Keys->Add another key
将生成的key(id_rsa.pub文件)内容copy到输入框中,save。
commd+shift+g进入
~/.ssh/就可以看得见私钥和公钥私钥的名字是 id_rsa,是服务器确定你身份的唯一凭证,是你的电脑与git进行通信的凭证。
公钥的名字是id_rsa.pub。把这个文件发给仓库管理员,仓库管理员会把这个公钥放到服务器上,以后git就通过上面的私钥跟服务器交互了。如果使用github就是自己把公钥内容添加上去
Linux命令
cd xxx 进入xxx目录
ls (-a/-A) 显示当前路径下所有文件(隐藏的)
pwd 显示当前绝对路径
mkdir xxx 创建文件夹xxx
man xxx 查看xxx命令手册
Git基础命令:详情可参考GitPro
clone 克隆远程仓库
init 初始化仓库
remote 连接远程仓库
pull 从远程仓库下拉获取新数据
push 将本地仓库新增或修改文件上传到远程仓库
add 添加文件或者修改文件,commit以及push之前使用
log 当前仓库提交过的日志信息
status 当前仓库版本状态
commit 提交到当前仓库中
branch 分支命令,相关增删查操作
checkout 使用远程仓库最后一个版本完全覆盖当前仓库内容/选择分支branch
diff 对比版本内容
merge 合并版本内容
登录Github,在个人github账户下创建仓库,仓库名称为**xxx.github.io**,其中xxx为用户名


因为我已经创建了该格式的仓库,因此会警告⚠️重名仓库。至此,github配置完毕。
NOTICE
No permission
解决链接:https://github.com/nodejs/node-gyp/issues/454
在npm安装的过程中,有可能会存在没有权限的问题,这个时候使用sudo, 并且添加--unsafe-perm,就是在原来的安装的命令下,前面加上sudo后面加上--unsafe-perm
比如安装hexo时候,原始为
1 | sudo npm install hexo-cli -g |
如果报错权限问题,那么改成
1 | sudo npm install hexo-cli -g --unsafe-perm |
Hexo
**Hexo **可以说是目前最流行的博客框架了,基于Nodejs,更多信息可以google,下面需要安装的工具包括 Nodejs,Hexo。
实际上不用管为什么,既然这么多人用并且很流行,拿来用就行了。
具体安装流程参考👉👉Hexo官方文档
安装Node.js
先安装nvm,这是Nodejs版本管理器,根据官网说明,nvm是最好的Node.js 安装方式。
根据nvm官网Github,安装方式如下,最好根据官网安装,随着时间变化,链接发生变化
curl方式
1
curl -o- https://raw.githubusercontent.com/creationix/nvm/v0.33.11/install.sh | bash
Wget方式
1
wget -qO- https://raw.githubusercontent.com/creationix/nvm/v0.33.11/install.sh | bash
安装完成之后添加到系统环境变量(
~/.bash_profile,~/.zshrc,~/.profile, or~/.bashrc)去,以便cmd启动nvm1
export NVM_DIR="${XDG_CONFIG_HOME/:-$HOME/.}nvm" [ -s "$NVM_DIR/nvm.sh" ] && \. "$NVM_DIR/nvm.sh" # This loads nvm
重启cmd,安装Node.js
1 | nvm install stable |
安装hexo
1 | sudo npm install hexo-cli -g |
安装完毕之后进行博客系统文件初始化
1
2
# 首先cd到想要安装blog的目录
$ cd xxx初始化blog文件夹
1
$ hexo init blog
进入blog文件
1
$ cd blog
文件夹列表如下:
_config.yml:全局配置文件;
source📁:博客文件保存地址,格式为Markdown,可以用过在内部创建md文件来实现博客的编写;
themes📁: 主题文件夹,涉及博客的表现主题;

- 对博客主题进行设置,本博客是通过知乎话题:有哪些好看的 Hexo 主题?使用的是
hexo-them-next主题,关于该主题的详细设置,可以参考next官方文档。这里只进行一些简单介绍:
安装主题
1
2
$ cd blog
$ git clone https://github.com/iissnan/hexo-theme-next themes/nex配置_config.yml文件,更多配置参考高级配置文档
1
vi _config.yml
进行修改
1
2
3
4
5
6
7
8
9
10
11
12
13
14
15
16
17
18
19
20
21
22
23
24
25
26
27
28
29
30
31
32
33
34
35
36
37
38
39
40
41
42
43
44
45
46
47
48
49
50
51
52
53
54
55
56
57
58
59
60
61
62
63
64
65
66
67
68
69
70
71
72
73
74
75
76
77
78
79
80
81
82
83
84
85
86
87
88
89
90
# Hexo Configuration
## Docs: http://hexo.io/docs/configuration.html
## Source: https://github.com/hexojs/hexo/
# Site 这下面的几项配置都很简单,你看我的博客就知道分别是什么意思
title: 博客名
subtitle: 副标题
description: 网站介绍
author: 作者
language: zh-CN #语言
timezone: #时区,此处不填写,hexo会以你目前电脑的时区为默认值
# URL 暂不配置,使用默认值
## If your site is put in a subdirectory, set url as 'http://yoursite.com/child' and root as '/child/'
url: http://yoursite.com
root: /
permalink: :year/:month/:day/:title/
permalink_defaults:
# Directory 暂不配置,使用默认值
source_dir: source
public_dir: public
tag_dir: tags
archive_dir: archives
category_dir: categories
code_dir: downloads/code
i18n_dir: :lang
skip_render:
# Writing 文章布局等,使用默认值
new_post_name: :title.md # File name of new posts
default_layout: post
titlecase: false # Transform title into titlecase
external_link: true # Open external links in new tab
filename_case: 0
render_drafts: false
post_asset_folder: false #创建博客时是否同时创建资源文件夹(内部一般存储图片等内容)
relative_link: false
future: true
highlight:
enable: true
line_number: true
tab_replace:
# Home page setting 不配做
# path: Root path for your blogs index page. (default = '')
# per_page: Posts displayed per page. (0 = disable pagination)
# order_by: Posts order. (Order by date descending by default)
index_generator:
path: ''
per_page: 10
order_by: -date
# Category & Tag 暂不配置,使用默认值
default_category: uncategorized
category_map:
tag_map:
# Date / Time format 时间格式,使用默认值
## Hexo uses Moment.js to parse and display date
## You can customize the date format as defined in
## http://momentjs.com/docs/#/displaying/format/
date_format: YYYY-MM-DD
time_format: HH:mm:ss
# Pagination
## Set per_page to 0 to disable pagination
per_page: 10 #每页显示的文章数,0表示不分页
pagination_dir: page
# Extensions 插件配置,暂时不配置
## Plugins: http://hexo.io/plugins/
## Themes: http://hexo.io/themes/
plugins:
- hexo-generator-feed
theme: next #使用的主题名称
feed: #之后配置rss会用,此处先不配置这个
type: atom
path: atom.xml
limit: 20
# Deployment 用于部署到github
## Docs: http://hexo.io/docs/deployment.html
deploy:
type: git #配置类型
repository: git@xxxx.git # github仓库ssh地址
branch: master #分支
message:因为使用的是git的部署方式,因此我们要安装hexo的git部署工具
1
$ npm install hexo-deployer-git --save
server测试
以上初步完成了博客的配置,选用的主题为next,现在对bolg进行测试,使用命令
hexo s --debug,正常命令行会出现1
Hexo is running at http://localhost:4000 . Press Ctrl+C to stop.
此时打开连接即可观看到博文界面。
个人域名
以上完成可博客的本地配置,如果想在外部网络访问到你的博客,这时候必须要有一个个人的域名才能实现了。采购域名的通道很多,个人推荐阿里云,或者腾讯云购买。具体如何购买很简单,登录阿里云,在控制台选择域名服务,之后选择你喜欢的个人域名以及后缀,选择付款即可,另外com,cn后缀需要进行实名备案(本人选择的com域名,上传身份证照片认证时间大概2小时),此外,推荐如果搭建个人的博客,最好一次多买几年,时间上算下来也没多少钱。
此时默认你已经购买好了个人域名,并且也进行开了实名认证
进行个人域名设置,打开阿里云–>登录–>右上角[控制台]–>左侧边栏[域名]

在个人域名出点击解析

如上所示,在个人域名解析出,设置三个A记录一个CNAME记录
A记录均使用@,记录值分别为,这四个记录最少写1个,实际上最好都写上
1
2
3
4
185.199.108.153
185.199.109.153
185.199.110.153
185.199.111.153实际上在命令行内输入如下命令同样可以得到ip地址,所得ip值为上面四个中的一个:
1
2
# xxx 对应github账户的用户名
ping xxx.github.ioCNAME记录使用
www,记录值为xxx.github.io此时要到创建的blog文件夹,在source文件夹内创建CNAME文件,内部写入你的域名(域名不要带入前面的http,www之类的信息,)
1
2
cd source
vi CANME
至此完成了全部设置。
部署发布
首先完成文章撰写,之后进行部署发布。
1 | hexo clean && hexo generate --deploy |
此时hexo会自动将blog文件提交到xxx.github.io仓库中。同时也可以通过个人域名进行博客访问。大功告成。
创建文章并编写
官方文档请参考https://hexo.io/zh-cn/docs/
创建文章
1
hexo new [layout] <title>
Layout 分为三类post,page和draft,其对应的文件夹如下,一般我们使用post形式
|post|source/_posts|
|page|source|
|draft|source/_drafts|执行命令之后会在相应文件夹创建新的文件。
网页模式调试
1
hexo s --debug
在
http://localhost:4000查看博文,这是后可以使用md编辑器一边编博客,一边在网页查看显示状况。编写完毕后进行发布
1
hexo clean && hexo g --d
Hexo基础命令:
1 | hexo generate (hexo g) 生成静态文件,会在当前目录下生成一个新的叫做public的文件夹 |
简写:
1 | $ hexo n == hexo new |
对博文进行压缩
1
2$ npm install gulp -g
$ npm install gulp-minify-css gulp-uglify gulp-htmlmin gulp-htmlclean gulp --save在blog文件夹下创建文件
gulpfile.js,填写如下内容:1
2
3
4
5
6
7
8
9
10
11
12
13
14
15
16
17
18
19
20
21
22
23
24
25
26
27
28
29
30
31
32
33var gulp = require('gulp');
var minifycss = require('gulp-minify-css');
var uglify = require('gulp-uglify');
var htmlmin = require('gulp-htmlmin');
var htmlclean = require('gulp-htmlclean');
// 压缩 public 目录 css
gulp.task('minify-css', function() {
return gulp.src('./public/**/*.css')
.pipe(minifycss())
.pipe(gulp.dest('./public'));
});
// 压缩 public 目录 html
gulp.task('minify-html', function() {
return gulp.src('./public/**/*.html')
.pipe(htmlclean())
.pipe(htmlmin({
removeComments: true,
minifyJS: true,
minifyCSS: true,
minifyURLs: true,
}))
.pipe(gulp.dest('./public'))
});
// 压缩 public/js 目录 js
gulp.task('minify-js', function() {
return gulp.src('./public/**/*.js')
.pipe(uglify())
.pipe(gulp.dest('./public'));
});
// 执行 gulp 命令时执行的任务
gulp.task('default', [
'minify-html','minify-css','minify-js'
]);当添加博文压缩功能之后,对博文进行生成并部署的命令修改为:
1
hexo clean && hexo g --d && gulp
更多设置参考
添加mathjax支持
Hexo原生兼容MathJax,在Next中启用MathJax只需要一步。在主题目录下找到_config.yml。用文本编辑器找到如下部分:
1 | plain _config.yml# MathJax Support |
如此以来就在Next主题中启用了MathJax支持,但事实上还存在着不少问题:
- 部分数学公式直接显示为代码的形式
- 部分数学公式的下标、角标等显示异常
- 希腊字母字体显示异常
更换渲染引擎
Hexo默认使用hexo-renderer-marked引擎进行网页渲染,其中对许多字符诸如划线、下划线、中括号等定义了转义。因此,在进行网页渲染时,数学公式中的这些字符先通过hexo-renderer-marked进行转义,就发生了歧义,而再通过MathJax渲染出来的数学公式,自然就显示不正常了。
在知道了原因以后,问题也就迎刃而解了,解决方法就是更换Hexo默认的hexo-renderer-marked渲染引擎。hexo-renderer-kramed就是一个不错的选择,它在hexo-renderer-marked的基础上修复了一些Bug,其中就包括取消大部分多余的转义。
安装hexo-renderer-kramed非常简单,只需在Hexo根目录下执行以下命令:
1 | npm install hexo-renderer-kramed --save |
这样就完成了hexo-renderer-kramed的安装,但还有一个容易被忽略的问题是,安装hexo-renderer-kramed的同时并不会自动对hexo-renderer-marked进行停用,数学公式仍要经过hexo-renderer-marked的转义,这样显然没有完全解决问题,故我们还需手动对hexo-renderer-marked进行停用。
在Hexo的根目录下找到package.json文件,用文本编辑器打开它,删除字符串hexo-renderer-marked所在的一行并保存。之所以不直接卸载hexo-renderer-marked,是因为其他重要包极有可能在卸载该包的同时被删除。
修复行内公式的转义字符
在做完工作上面的工作后,行间公式就可以被正确渲染了,但行内公式却还存在着部分问题,这是因为对行间定义的转义字符和对行内定义的转义字符并不相同,还有部分已定义的行间转义字符会与数学公式中可能用到的字符发生冲突,用到这些字符的数学公式在渲染前仍被进行了转义。
修复这一问题的方法是,在根目录下依次打开node_modules\kramed\lib\rules,并找到inline.js文件。
用文本编辑器编辑文件的第11行和第20行:
1 | js inline.jsline 11, |
保存文件。如此一来,所有对数学公式中字符的不合理转义就都被取消了,数学公式的渲染和显示也就正常了。
确保所有公式都被渲染
在条件支持的情况下,MathJax会对页面上的所有位置的标签内都进行渲染;但在条件不允许时,MathJax对数学公式的渲染可能止于页面上的某个位置,其后的数学公式都将不被渲染而直接显示为代码的形式。
这时,就需要在文章的开头font-matter中手动打开MathJax的开关,如下图:
1 | plain _config.yml--- |
如上,在使用了数学公式的页面上增加一行
1 | mathjax: true |
,这样就能确保页面上所有数学公式都被正确渲染了,对于不需要渲染的页面,不进行mathjax设置,提高加载速度
增加内容界面跨度
修改在next主题文件source/css/_schemes/Picses/_layout.styl
在文件最后添加如下内容
1 | // 以下为新增代码!! |
添加百度及google搜索
参考: https://www.jianshu.com/p/25145964abf3
设置页面文章的篇数
使用
npm install --save命令来安装需要的 Hexo 插件。1
2
3npm install --save hexo-generator-index
npm install --save hexo-generator-archive
npm install --save hexo-generator-tag等待扩展全部安装完成后,在 站点配置文章 中,设定如下选项:
1
2
3
4
5
6
7
8
9
10
11
12
13index_generator:
path: ''
per_page: 10
order_by: -date
# 归档数量
archive_generator:
per_page: 20
yearly: true
monthly: true
# 标签数量
tag_generator:
per_page: 10
错误处理
在执行 hexo deploy 后,出现 error deployer not found:git 的错误处理
1
npm install hexo-deployer-git --save
Next