本篇涉及平时工作中使用的一些Python 相关轮子,在此记录,不断补充更新……
文件及路径 遍历读取文件夹下所有目录 在Python中使用os.path.lisdir()可以实现读取给定路径下的所有文件,并返回文件名列表,在给定的路径下,有可能存在着子目录,这个时候我们想要读取子目录下的文件又该如何处理呢
1 2 3 4 5 6 7 8 9 10 11 12 13 14 15 16 17 18 19 20 21 22 23 24 25 import osdef readDir (dirPath ): if dirPath[-1 ] == '/' : print ( u'文件夹路径末尾不能加/' ) return allFiles = [] if os.path.isdir(dirPath): fileList = os.listdir(dirPath) for f in fileList: full_path = os.path.join(dirPath, f) if os.path.isdir(full_path): subFiles = readDir(full_path) allFiles = subFiles + allFiles else : allFiles.append(full_path) return allFiles else : return 'Error,not a dir'
如上是对文件进行读取,当读取文件之后,如果文件是.txt文件,那么读取这个文件的内容并打印
1 2 3 4 5 6 7 8 9 10 11 12 13 14 15 16 def readTxt (filePath): with open (filePath) as f: lines = f.readlines() for line in lines: data = line.strip().split('\001' ) for i in data: print i if __name__ == '__main__' : dirPath = 'xxxx' fileList=ReadDirFiles.readDir(dirPath) for f in fileList: if f.split('.' )[-1 ] in ['txt' ]: readTxt(f)
PANDAS CSV2LIST csv是很常用的数据存储方式,推荐使用pandas读取,pandas真是一个非常棒的数据分析工具,说回本例,数据存储在csv文件中,读取里面的一列或者某几列存储为列表格式
1
2
3
4
5
6
7
8
9
10
11
12
13
14
15
import pandas as pdcsv_file='Pandas_example_read.csv' df_example=pd.read_csv(filepath,header=0 ) df_example = pd.read_csv('Pandas_example_read.csv' ,names=['A' ,'B' ,'C' ]) df_example_noCols = pd.read_csv('Pandas_example_read_withoutCols.csv' , header=None ) df_example_noCols = pd.read_csv('Pandas_example_read_withoutCols.csv' , names=['A' , 'B' ,'C' ]) select=df_example['key' ].tolist()
图片处理 Canny边缘检测 参考:https://mp.weixin.qq.com/s/ejwnsPkrpSJieCPssU8Caw
主要涉及如下几个操作
降噪
梯度计算
非最大抑制
双重阈值
滞后边缘跟踪
1
2
3
4
5
6
7
8
9
10
11
12
13
14
15
16
17
18
19
20
21
22
23
24
25
26
27
28
29
30
31
32
33
34
35
36
37
38
39
40
41
42
43
44
45
46
47
48
49
50
51
52
53
54
55
56
57
58
59
60
61
62
63
64
65
66
67
68
69
70
71
72
73
74
75
76
77
78
79
80
81
82
83
84
85
86
87
88
89
90
91
92
93
94
95
96
97
98
99
100
101
102
103
104
105
106
107
108
109
110
111
112
113
114
115
116
117
118
119
120
121
122
123
124
125
126
127
128
129
130
131
132
133
134
135
136
137
138
139
140
141
142
143
144
from scipy import ndimagefrom scipy.ndimage.filters import convolvefrom scipy import miscimport numpy as npclass cannyEdgeDetector : def __init__ (self, imgs, sigma=1 , kernel_size=5 , weak_pixel=75 , strong_pixel=255 , lowthreshold=0.05 , highthreshold=0.15 ): self.imgs = imgs self.imgs_final = [] self.img_smoothed = None self.gradientMat = None self.thetaMat = None self.nonMaxImg = None self.thresholdImg = None self.weak_pixel = weak_pixel self.strong_pixel = strong_pixel self.sigma = sigma self.kernel_size = kernel_size self.lowThreshold = lowthreshold self.highThreshold = highthreshold return def gaussian_kernel (self, size, sigma=1 ): size = int (size) // 2 x, y = np.mgrid[-size:size+1 , -size:size+1 ] normal = 1 / (2.0 * np.pi * sigma**2 ) g = np.exp(-((x**2 + y**2 ) / (2.0 *sigma**2 ))) * normal return g def sobel_filters (self, img ): Kx = np.array([[-1 , 0 , 1 ], [-2 , 0 , 2 ], [-1 , 0 , 1 ]], np.float32) Ky = np.array([[1 , 2 , 1 ], [0 , 0 , 0 ], [-1 , -2 , -1 ]], np.float32) Ix = ndimage.filters.convolve(img, Kx) Iy = ndimage.filters.convolve(img, Ky) G = np.hypot(Ix, Iy) G = G / G.max () * 255 theta = np.arctan2(Iy, Ix) return (G, theta) def non_max_suppression (self, img, D ): M, N = img.shape Z = np.zeros((M,N), dtype=np.int32) angle = D * 180. / np.pi angle[angle < 0 ] += 180 for i in range (1 ,M-1 ): for j in range (1 ,N-1 ): try : q = 255 r = 255 if (0 <= angle[i,j] < 22.5 ) or (157.5 <= angle[i,j] <= 180 ): q = img[i, j+1 ] r = img[i, j-1 ] elif (22.5 <= angle[i,j] < 67.5 ): q = img[i+1 , j-1 ] r = img[i-1 , j+1 ] elif (67.5 <= angle[i,j] < 112.5 ): q = img[i+1 , j] r = img[i-1 , j] elif (112.5 <= angle[i,j] < 157.5 ): q = img[i-1 , j-1 ] r = img[i+1 , j+1 ] if (img[i,j] >= q) and (img[i,j] >= r): Z[i,j] = img[i,j] else : Z[i,j] = 0 except IndexError as e: pass return Z def threshold (self, img ): highThreshold = img.max () * self.highThreshold; lowThreshold = highThreshold * self.lowThreshold; M, N = img.shape res = np.zeros((M,N), dtype=np.int32) weak = np.int32(self.weak_pixel) strong = np.int32(self.strong_pixel) strong_i, strong_j = np.where(img >= highThreshold) zeros_i, zeros_j = np.where(img < lowThreshold) weak_i, weak_j = np.where((img <= highThreshold) & (img >= lowThreshold)) res[strong_i, strong_j] = strong res[weak_i, weak_j] = weak return (res) def hysteresis (self, img ): M, N = img.shape weak = self.weak_pixel strong = self.strong_pixel for i in range (1 , M-1 ): for j in range (1 , N-1 ): if (img[i,j] == weak): try : if ((img[i+1 , j-1 ] == strong) or (img[i+1 , j] == strong) or (img[i+1 , j+1 ] == strong) or (img[i, j-1 ] == strong) or (img[i, j+1 ] == strong) or (img[i-1 , j-1 ] == strong) or (img[i-1 , j] == strong) or (img[i-1 , j+1 ] == strong)): img[i, j] = strong else : img[i, j] = 0 except IndexError as e: pass return img def detect (self ): imgs_final = [] for i, img in enumerate (self.imgs): self.img_smoothed = convolve(img, self.gaussian_kernel(self.kernel_size, self.sigma)) self.gradientMat, self.thetaMat = self.sobel_filters(self.img_smoothed) self.nonMaxImg = self.non_max_suppression(self.gradientMat, self.thetaMat) self.thresholdImg = self.threshold(self.nonMaxImg) img_final = self.hysteresis(self.thresholdImg) self.imgs_final.append(img_final) return self.imgs_final
降噪 由于场景背后涉及的数学主要基于导数(参见步骤2:梯度计算),边缘检测结果对图像噪声高度敏感。摆脱图像噪声的一种方法是使用高斯模糊来平滑它。为此图像卷积技术应用高斯核(3x3,5x5,7x7等…)。内核大小取决于预期的模糊效果。基本上内核最小,模糊不太明显。
判断图像是否模糊 Reference:https://juejin.im/post/5b76df76f265da43330c3f50
将图像转换成灰度图,之后使用拉普拉斯算子进行滤波,得到的是图像的高频图像,会将低频图像去掉,计算滤波之后的图像的方差,如果方差较大,认为滤波之后的图像具有更广阔的频率范围,认为是一个清晰的图像; 如果滤波之后方差较小,可以认为,经过滤波得到的图像,频率范围很窄,可以在一定程度上认为这是一个模糊的图像。总而言之,是通过拉普拉斯滤波之后的图像的方差的值进行判断。
1
2
3
4
5
6
7
import cv2def getImageVar (imgPath ): image = cv2.imread(imgPath); img2gray = cv2.cvtColor(image, cv2.COLOR_BGR2GRAY) imageVar = cv2.Laplacian(img2gray, cv2.CV_64F).var() return imageVar
但是会存在一个问题,那就是对于远景虚化或者远景模糊的图像,经过滤波之后,得到的图像会将虚化部分过滤掉,这样相比于正常的清晰照片,得到的图像的方差较低,有可能会被误杀。
IOU的计算 在ObjectDetection任务中,在后处理阶段一般要进行NMS处理,也就是需要计算两个box之间的IOU,顾明思议,IOU就是两个矩形交集面积与并集面积的比值,比值的范围为$[0,1]$,比值越大,表示两个矩形越相同。
代码实现
1 2 3 4 5 6 7 8 9 10 11 12 13 14 15 16 17 18 19 20 21 22 23 24 25 26 27 28 29 30 31 32 33 def _cal_iou (query_box, store_box ): x1, y1, x2, y2 = query_box w1 = x2 - x1 h1 = y2 - y1 query_area = w1 * h1 ratios = [] for box in store_box: x_11, y_11, x_22, y_22 = box w_11 = x_22 - x_11 h_11 = y_22 - y_11 store_area = w_11*h_11 endx = max (x2, x_22) startx = min (x1, x_11) width = w1 + w_11 - (endx - startx) endy = max (y2, y_22) starty = min (y1, y_11) height = h1 + h_11 - (endy - starty) if width <= 0 or height <= 0 : ratio = 0 else : inter_area = width * height ratio = inter_area / (query_area + store_area - inter_area) ratios.append(ratio) return ratios
数据转换Convertation String&List 该程序涉及将字符串转换为list,这里的字符串不是简单地字符串,是具有数据格式的字符串,如下所示
1 demo='[{"label":0,"dots":[{"x":109.60000000000001,"y":7.466666666666667},{"x":311.2,"y":7.466666666666667},{"x":311.2,"y":197.33333333333334},{"x":109.60000000000001,"y":197.33333333333334}]}]'
可以看出来,虽然整体是一个string的格式,但是内部实际上是列表,并且列表内是一个字典,那么如何将这个字符串转换成列表,并且能够读取列表中的字典呢?
很简单,使用依赖包ast
处理代码如下所示
1 2 3 4 5 6 7 8 9 10 11 12 13 from ast import literal_evalmlist = literal_eval(demo) assert isinstance (mlist,list ), "After literal_eval, must return a list" out=[] for dic in mlist: want=dic['dots' ] keys=['x' ,'y' ] for each_points in want: for key in keys: out.append(each_points[key]) print out
经过如上程序,就可以得到列表
1 [109.60000000000001, 7.466666666666667, 311.2, 7.466666666666667, 311.2, 197.33333333333334, 109.60000000000001, 197.33333333333334]
对应的jupyter程序截图如下
Dict&Object 在Object中直接调用object.__dict__就可以得到当前object的dictionary形式
当然了,还要有反向操作,就是将dictionary转换成struct形式,通过一个转换方程
1
2
3
4
5
6
7
class Struct (object ): def __init__ (self, d ): for a, b in d.items(): if isinstance (b, (list , tuple )): setattr (self, a, [Struct(x) if isinstance (x, dict ) else x for x in b]) else : setattr (self, a, Struct(b) if isinstance (b, dict ) else b)
对应的jupyter测试程序如下所示↓↓↓↓
数据序列化 在进行传输的过程中,一般对数据进行序列化,比如在图片转化成base64格式,tcp传输使用pb或protobuf格式等,根据自己工作的经验,对这方面进行一下总结记录。
pickle&cPickle 使用pickle.dumps和pickle.loads的方式进行序列化和反序列化
Python中提供了pickle和cPickle两个模块,cPickle顾名思义使用C编译的,运行速度更快,但是cPickle模块中定义的类型不能被继承(其实大多数时候,我们不需要从这些类型中继承,推荐使用cPickle)。cPickle和pickle的序列化/反序列化规则是一样的,使用pickle序列化一个对象,可以使用cPickle来反序列化。同时,这两个模块在处理自引用类型时会变得更加“聪明”,它不会无限制的递归序列化自引用对象,对于同一对象的多次引用,它只会序列化一次。
在操作的时候有一个参数需要注意protocol这个表示代表了序列化模式(pickle协议),在python2.X版本默认值为0,在python3.X本默认值为3 protocol值越大,dump的速度越快,并且支持的数据类型更多,保存下来的文件占用空间更小
Json 使用json.dumps和json.loads对字典数据进行序列化和反序列化
在Python中包含多个json处理方式
依赖库
序列化耗时
反序列化耗时
yajl
1.910
1.970
cjson
3.305
1.328
simplejson
10.279
4.658
stdlib json
7.013
8.579
ujson
2.084
1.157
一般情况下使用ujson来也就是import ujson as json使用方法还是json.dumps和json.loads
显而易见,json类型的数据保存了数据中元素的数据类型和数据结构等信息,比如json中保存多维数组数据,只需要在使用vector.to_list()将其赋值给字典中的元素即可使用json.dumps的方式保存,但是json方式带来的问题就是序列化的时间很慢,尤其是带序列化的数据越大,所需时间大量增加。
msgpack 和json类似,msgpackIt's like JSON. but fast and small.目前我已经不再使用json而使用msgpack了,序列化和反序列化时间相比usjon更快,也是使用msgpack.loads和msgpack.dumps的方式。
struct 将字符串转化为二进制字节流,这样缺点是最造成数据的结构丢失,但是好处是会最大程度减小数据的大小。在pack的时候,只能处理float的数据,也就是如果数据是多维的,那么要对数据进行铺平才能进行二进制自己留转化。
1
2
3
4
5
6
7
8
9
10
11
12
13
import structimport numpy as npdata = np.random.uniform(size=(10 , 4 , 2 )) data_size = data.size data_shape = data.shape packed_data = struct.pack('=%sf' % data.size, *data.flatten('F' )) unpacked_data = struct.unpack('=%sf' % data_size, packed_data) original_data = np.reshape(np.asarray(unpacked_data), data_shape,order='F' ) print ("original_data shape is {}" .format (original_data.shape))
thrift thrift一般用于定义数据格式,用来进行服务之间的tcp传递。一般是两种处理方式,一个是将字典转化成struct的形式,也就是先使用thrift
安装thrift https://thrift.apache.org/docs/install/debian
编写thrift文件定义struct和tcp函数的接口
假设如下文件名为service.thrift
1
2
3
4
5
6
7
8
9
10
11
12
13
14
15
16
17
18
19
20
21
# !/usr/local/bin/thrift --gen cpp --gen py:new_style -o . -r include "base.thrift" // thrift dependicy namespace py Service // namespace, the folder name you want generate by thrift # define request struct ServiceRequest{ 1: binary image_binary, // image binary 2: i32 req_id, // request id 255: optional base.Base Base // base caller } # define response struct ServiceResponse { 1: binary output, 255: optional base.BaseResp BaseResp // base response } # define service service Service { ServiceResponse forward(1: ServiceRequest request), }
实际上按照上面的步骤,导入需要的依赖,一般是通用项,用来保存常用的请求和返回的status,msg等信息,对于上面的base.thrift我这里是这么定义的 ↓↓↓↓↓
1
2
3
4
5
6
7
8
9
10
11
12
13
14
15
16
17
18
19
20
21
22
23
24
25
26
# defination namespace py base namespace go base namespace java com.bytedance.thrift.base struct TrafficEnv { 1: bool Open = false, 2: string Env = "", } # define the base request struct Base { 1: string LogID = "", 2: string Caller = "", 3: string Addr = "", 4: string Client = "", 5: optional TrafficEnv TrafficEnv, 6: optional map<string, string> Extra, } # define the base response struct BaseResp { 1: string StatusMessage = "", 2: i32 StatusCode = 0, 3: optional map<string, string> Extra, }
定义好这两个thrift文件之后那么使用安装的thrift命令生成对应的可读取文件, 如果想要生成python文件,那么可以直接执行命令行命令
1
2
3
4
5
6
7
8
# !/usr/bin/env bash echo "Step1: thrift deploy" thrift -r --gen py:new_style -o . service.thrift echo "Step2: remove gen-py detail output to root" mv gen-py gen_py
如此就会生成文件夹gen_py在该文件夹下包含了两个目录service 和base,在这个目录下包含着对应的接口。
数据处理 去重并保持原有顺序 以前一直使用set来进行去重,但是set这种方式第一是只能够去除hash类型的数据的重复,并且去重之后无法保证原来的排序,如下所示
1 2 3 x=[1 , 5 , 2 , 1 , 9 , 1 , 5 , 10 ] y=list (set (x))
在python-cookbook一书中介绍了一种方法,可以在去重的时候保持原数据的顺序
1 2 3 4 5 6 7 8 9 10 def dedupe (items ): seen = set () for item in items: if item not in seen: yield item seen.add(item) x=[1 , 5 , 2 , 1 , 9 , 1 , 5 , 10 ] y=list (dedupe(x))
命名切片 在Python中切片非常好用,但是有的时候数据边长,或者刚接触的代码很难搞清楚切片的含义,建议使用命名切片
1
2
3
4
5
6
record = '....................100 .......513.25 ..........' SHARES = slice (20 , 23 ) PRICE = slice (31 , 37 ) cost_ori = int (record[20 :23 ]) * float (record[31 :37 ]) cost_imp = int (record[SHARES]) * float (record[PRICE])
代码中cost_ori和cost_imp是等价的,很显然使用命名切片的方式更容易理解代码含义。
排列组合 使用标准包itertools实现排列组合
排列-不考虑顺序:list(itertools.combinations(src_queue,num))
组合-考虑顺序:list(itertools.permutations(src_queue,num))
参数:src_queue 要处理的列表,num组合的元素数量
随机数 random 一般常用的功能如下
random.choice() 随机选择一个元素
random.sample() 随机选择N个元素组成列表
random.shuffle() 打乱数据
random.seed() 随机种子,在shuffle之前使用,直生效一次
random.randint() 生成随机整数
random.random() 生成0-1之间随机浮点数,用来控制概率
random.uniform() 计算均匀分布随机数
random.gauss() 计算正态分布随机数
使用的时候可以使用**random.Random(random_seed)**来创建全局变量,这样seed可以全局生效
1
2
3
4
5
6
7
8
import randomrandom_seed=123456 rng=random.Random(random_seed) samples=[1 ,2 ,3 ,5 ,6 ,7 ] rng.shuffle(all_samples) if rng.random()<0.5 : print ("rate is little than 0.5" )
按照指定概率产生随机数 这个的使用场景是,已经给了一个数组,并且给了一个抽样的概率或者权重,根据给定的概率来对这个数组进行抽样,两个设计思路
按照给定的概率进行抽样,这里面有两个要求
数组的长度和概率数组的长度一致
概率数组求和为1
1
2
3
4
5
6
7
8
9
10
import randomdef random_pick (some_list,probabilities ): x = random.uniform(0 ,1 ) cumulative_probability=0.0 for item,item_probability in zip (some_list,probabilities): cumulative_probability+=item_probability if x < cumulative_probability: break return item
思路很直白,如果第一个没有抽到,那么下一个抽到的概率按道理就应该更大一些,最差的情况会抽到数组中最后一个元素。另外,这种方法要保证概率之和==0。
按照给定的权重进行抽样,实际上这个就是把概率进行了一下改造,比如按照概率[0.1,0.3,0.6]与按权重[1,3,6]抽样是等价的。这个时候没有了概率为 1的要求
1
2
3
4
5
6
import randomsequence=[1 ,2 ,3 ,4 ,5 ] relative_odds=[1 ,1 ,2 ,4 ,7 ] table=[z for x,y in zip (sequence,relative_odds) for z in [x]*y] for i in range (10 ): print (random.choice(table))
这种方法有一个不太好的地方,就是table会额外占据一定空间。
数据运算加速 Numba加速 numpy底层使用的c++实现的,实际上已经很快了,但是由于Python是一种动态编译的方法,拖累numpy速度的不是numpy的运算,而是Python的动态编译造成的,为了解决这一问题,显而易见就是把动态编译改成静态编译,numba 就是用来做这个的,正如官方所说Numba makes Python code fast .
按照官网所述:当程序中包含大量运算,用到了大量的numpy运算或者包含大量的循环结构,这个时候可以考虑使用numba
使用的时候是按照修饰器的方法
1
2
3
4
5
6
7
8
9
10
11
12
from numba import jitimport random@jit(nopython=True ) def monte_carlo_pi (nsamples ): acc = 0 for i in range (nsamples): x = random.random() y = random.random() if (x ** 2 + y ** 2 ) < 1.0 : acc += 1 return 4.0 * acc / nsamples
进行测试的结果如图所示
可以看到经过numba加速之后,速度提升了大约30倍。
按照官方文档,最好使用nopython=True。nopython编译模式的行为是实质上编译装饰后的函数,以便其完全运行而无需Python解释器的参与,这样可以提升代码的运行速度。
获取设备信息 一般使用的是psutil 模块,获取当前设备的cpu,memory,disk等使用情况
1 2 3 4 5 6 7 8 9 10 11 12 13 14 15 16 17 18 19 import psutilimport timefrom datetime import datetimedef MonitorSystem (): cpuper = psutil.cpu_percent() mem = psutil.virtual_memory() memper = mem.percent now = datetime.now() ts = now.strftime('%Y-%m-%d %H:%M:%S' ) line = f'{ts} cpu:{cpuper} %, mem:{memper} %' print (line)
时间/日期/定时任务 获取当前时间 下面的程序获取当前时刻并打印输出为string格式
1
2
3
4
import timedef GetTime (): time_now=time.strftime('%Y-%m-%d-%H-%M-%S' ,time.localtime(time.time())) return time_now
获取当前时间戳 定时任务 sleep方式 最简单的方法time.sleep()但是只能控制任务的间隔无法控制任务具体启动的时刻
1 2 3 4 5 6 7 8 9 10 11 12 13 14 15 16 17 18 19 20 21 22 23 24 25 26 import psutilimport timeimport datetimedef MonitorSystem (logfile = None ): cpuper = psutil.cpu_percent() mem = psutil.virtual_memory() memper = mem.percent now = datetime.datetime.now() ts = now.strftime('%Y-%m-%d %H:%M:%S' ) line = f'{ts} cpu:{cpuper} %, mem:{memper} %' print (line) if logfile: logfile.write(line) def loopMonitor (): while True : MonitorSystem() time.sleep(2 ) loopMonitor()
Timer模块 在使用多线程编程,为了线程安全,优先使用该方法。
定时器只能执行一次,如果需要重复执行,需要重新添加任务;在执行的时候携程递归的方式可以保证函数是重复执行的。
1
2
3
4
5
6
7
8
9
10
11
12
13
14
15
16
17
18
19
20
21
22
23
24
25
26
27
28
29
30
31
from threading import Timerimport psutilimport timefrom datetime import datetimedef MonitorSystem (logfile = None ): cpuper = psutil.cpu_percent() mem = psutil.virtual_memory() memper = mem.percent now = datetime.now() ts = now.strftime('%Y-%m-%d %H:%M:%S' ) line = f'{ts} cpu:{cpuper} %, mem:{memper} %' print (line) if logfile: logfile.write(line) Timer(3 , MonitorSystem).start() def MonitorNetWork (logfile = None ): netinfo = psutil.net_io_counters() now = datetime.datetime.now() ts = now.strftime('%Y-%m-%d %H:%M:%S' ) line = f'{ts} bytessent={netinfo.bytes_sent} , bytesrecv={netinfo.bytes_recv} ' print (line) if logfile: logfile.write(line) Timer(1 , MonitorNetWork).start() MonitorSystem() MonitorNetWork()
任务框架APScheduler
多进程 所谓多进程可以理解成,独立运行多个程序,可以看做是一种并发环境;与之对应的是多线程,多线程是在一个进程中的,每个进程处理一部分的数据或操作。
在机器学习和深度学习中,当模型训练好之后,一般使用多进程进行Inference 操作,但是有一点需要注意,要在每个进程中单独Load模型。
一般的操作方法是
1 2 3 4 5 6 7 8 9 10 11 12 13 14 15 16 17 18 19 20 21 22 23 24 25 26 27 28 29 30 31 32 33 34 35 36 37 38 39 40 41 42 43 44 45 from __future__ import division, print_functionimport osfrom multiprocessing import Processdef exit_signal_handler (sig=None , frame=None ): t1 = time.time() while (multiprocessing.active_children()): for p in multiprocessing.active_children(): t2 = time.time() if (t2 - t1 > 5 ): os.kill(p.pid, signal.SIGKILL) else : p.terminate() time.sleep(1 ) os._exit(0 ) signal.signal(signal.SIGINT, exit_signal_handler) signal.signal(signal.SIGTERM, exit_signal_handler) signal.signal(signal.SIGHUP, exit_signal_handler) processes=[] process_num=10 for process_idx in range (process_num): consumer = Process(target=consumer, args=(process_idx,)) processes.append(consumer) try : for p in processes: p.daemon = True p.start() for p in processes: p.join() except KeyboardInterrupt: self.logger.info('Parent received ctrl-c' ) for p in processes: p.terminate() p.join()
需要注意,在process的args参数,要是一个可迭代的对象,可以是列表,元组等
多进程数据同步 在多进程中,如果需要进行数据同步,一般使用队列来进行进程数据管理,比如一个进程写入数据,其余进程读取数据,那么这里的进程要使用multiprocessing下面的Queue,不能使用默认的Queue。
Server&Client https://zeromq.org/languages/python/
logging 简单版 只使用log代替print显示,并不写入文件
全局设置一个logger,不写入文件
1
2
3
4
5
6
7
8
9
10
import logginglogger_stdout = logging.getLogger("CHECKPOINT" ) logger_stdout.propagate = False if not logger_stdout.handlers: formatter = logging.Formatter( '%(asctime)s - %(name)s - [%(process)d - %(levelname)s] :: [%(module)s|%(lineno)s] ==>> %(message)s' ) streamhandler = logging.StreamHandler(stream=sys.stdout) streamhandler.setFormatter(formatter) streamhandler.setLevel(LEVEL) logger_stdout.addHandler(streamhandler)
脚本中临时使用,在文件的头部进行如下设置
1
2
3
4
5
import logginglogging.basicConfig(format ='%(asctime)s - %(name)s - [%(levelname)s] - %(message)s' , stream=sys.stderr) logger = logging.getLogger() logger.setLevel(logging.INFO)
进阶版 日志打印模块写入文件,把一个轮子记录在此,直接使用
1
2
3
4
5
6
7
8
9
10
11
12
13
14
15
16
17
18
19
20
21
22
23
24
25
26
27
28
29
30
31
32
33
34
35
36
import loggingimport osdef get_logger (_loggerDir, log_filename, logger_name ): """[summary] Arguments: _loggerDir {[type]} -- [directory of the Logger] log_filename {[type]} -- [Logger name ] logger_name {[type]} -- [Logger file name] Returns: [type] -- [description] """ _LogFile = os.path.join(_loggerDir, log_filename) logger = logging.getLogger(logger_name) logger.setLevel(logging.INFO) logger.propagate=False fh = logging.FileHandler(_LogFile) fh.setLevel(logging.INFO) console = logging.StreamHandler() console.setLevel(logging.INFO) _LogFormat = logging.Formatter("%(asctime)2s -%(name)-12s: %(levelname)-10s - %(message)s" ) fh.setFormatter(_LogFormat) console.setFormatter(_LogFormat) logger.addHandler(fh) logger.addHandler(console) return logger
Opencv&PIL Opencv默认读取的图片格式为BGR 通道顺序,写入的时候默认也是BGR 的格式,,如果使用OpenCV读写,那么不需要进行通道转换,但是如果使用OpenCV读用PIL 写,那么在读取的时候要进行图片通道转换。
1
2
3
4
5
6
7
8
9
10
11
12
13
14
import cv2from PIL import Imageimage_file='' img_data=cv2.imread(image_file) img_crop=img_data[y1:y2,x1:x2] cv2.imwrite(crop_file_dir,img_crop) img_data=cv2.imread(image_file) img_data=img_data[:,:,::-1 ] img=Image.fromarray(img_data) img.save('xxxx' )
文本过滤 DFA过滤敏感词算法 核心思想:创建敏感词树
1
2
3
4
5
6
7
8
9
10
11
12
13
14
15
16
17
18
19
20
21
22
23
24
25
26
27
28
29
30
31
32
33
34
35
36
37
38
39
40
41
42
43
44
45
46
47
48
49
50
51
52
53
54
55
56
57
58
59
60
61
62
63
64
65
66
67
68
69
70
71
72
73
74
75
76
77
78
79
80
81
82
83
84
85
86
87
88
89
90
from __future__ import print_functionimport sysreload(sys) sys.setdefaultencoding('utf-8' ) class DFAFilter (object ): def __init__ (self ): self.keyword_chains = {} self.delimit = '\x00' def add (self, keyword ): keyword = keyword.lower() chars = keyword.strip() if not chars: return level = self.keyword_chains for i in range (len (chars)): if chars[i] in level: level = level[chars[i]] else : if not isinstance (level, dict ): break for j in range (i, len (chars)): level[chars[j]] = {} last_level, last_char = level, chars[j] level = level[chars[j]] last_level[last_char] = {self.delimit: 0 } break if i == len (chars) - 1 : level[self.delimit] = 0 def parse (self, path ): contens = open (path, "r" ).readlines() for line in contens: char = line.strip() if line != "" : self.add(char) def search (self, message, repl="*" ): message = message.lower() ret = [] start = 0 while start < len (message): level = self.keyword_chains step_ins = 0 for char in message[start:]: if char in level: step_ins += 1 if self.delimit not in level[char]: level = level[char] else : ret.append(repl * step_ins) start += step_ins - 1 break else : ret.append(message[start]) break else : ret.append(message[start]) start += 1 return '' .join(ret) def findall (self, message, repl="*" ): message = message.lower() start = 0 while start < len (message): level = self.keyword_chains step_ins = 0 for char in message[start:]: if char in level: step_ins += 1 if self.delimit not in level[char]: level = level[char] else : return True start += 1 return False blacklist = "./blacklist.txt" dfa = DFAFilter() dfa.parse(blacklist) text="新疆骚乱 苹果 新品发布会 AV女优" print (dfa.findall(text),file=sys.stderr)
AC自动机过滤敏感 给出n个单词,再给出一段包含m个字符的文章,让你找出有多少个单词在文章里出现过。
AC自动机就是字典树+kmp算法+失配指针
1 2 3 4 5 6 7 8 9 10 11 12 13 14 15 16 17 18 19 20 21 22 23 24 25 26 27 28 29 30 31 32 33 34 35 36 37 38 39 40 41 42 43 44 45 46 47 48 49 50 51 52 53 54 55 56 57 58 59 60 61 62 63 64 65 66 67 68 69 70 71 72 73 74 75 76 77 78 79 80 81 82 83 84 85 86 87 88 89 90 91 92 93 94 95 96 97 98 99 100 101 102 103 104 105 106 import timetime1=time.time() class node (object ): def __init__ (self ): self.next = {} self.fail = None self.isWord = False self.word = "" class ac_automation (object ): def __init__ (self ): self.root = node() def addword (self, word ): temp_root = self.root for char in word: if char not in temp_root.next : temp_root.next [char] = node() temp_root = temp_root.next [char] temp_root.isWord = True temp_root.word = word def make_fail (self ): temp_que = [] temp_que.append(self.root) while len (temp_que) != 0 : temp = temp_que.pop(0 ) p = None for key,value in temp.next .item(): if temp == self.root: temp.next [key].fail = self.root else : p = temp.fail while p is not None : if key in p.next : temp.next [key].fail = p.fail break p = p.fail if p is None : temp.next [key].fail = self.root temp_que.append(temp.next [key]) def search (self, content ): p = self.root result = [] currentposition = 0 while currentposition < len (content): word = content[currentposition] while word in p.next == False and p != self.root: p = p.fail if word in p.next : p = p.next [word] else : p = self.root if p.isWord: result.append(p.word) p = self.root currentposition += 1 return result def parse (self, path ): contenst=open (path,"r" ).realines() with open (path,encoding='utf-8' ) as f: for keyword in f: self.addword(str (keyword).strip()) def words_replace (self, text ): """ :param ah: AC自动机 :param text: 文本 :return: 过滤敏感词之后的文本 """ result = list (set (self.search(text))) for x in result: m = text.replace(x, '*' * len (x)) text = m return text if __name__ == '__main__' : ah = ac_automation() path='blacklist.txt' ah.parse(path) text1="新疆骚乱苹果新品发布会雞八" text2=ah.words_replace(text1) print (text1) print (text2) time2 = time.time() print ('总共耗时:' + str (time2 - time1) + 's' )
出错重试 Tenacity 在爬虫或者下载的时候很容易出现错误,报错的时候进行自动重试
1
2
3
4
5
6
7
8
from tenacity import retry,stop_after_delay,stop_after_attempt,wait_fixed@retry(stop=(stop_after_delay(10 5 ), wait=wait_fixed(2 ) def stop_after_10_s_or_5_retries (): print ("Stopping after 10 seconds or 5 retries" ) """other progress""" raise Exception
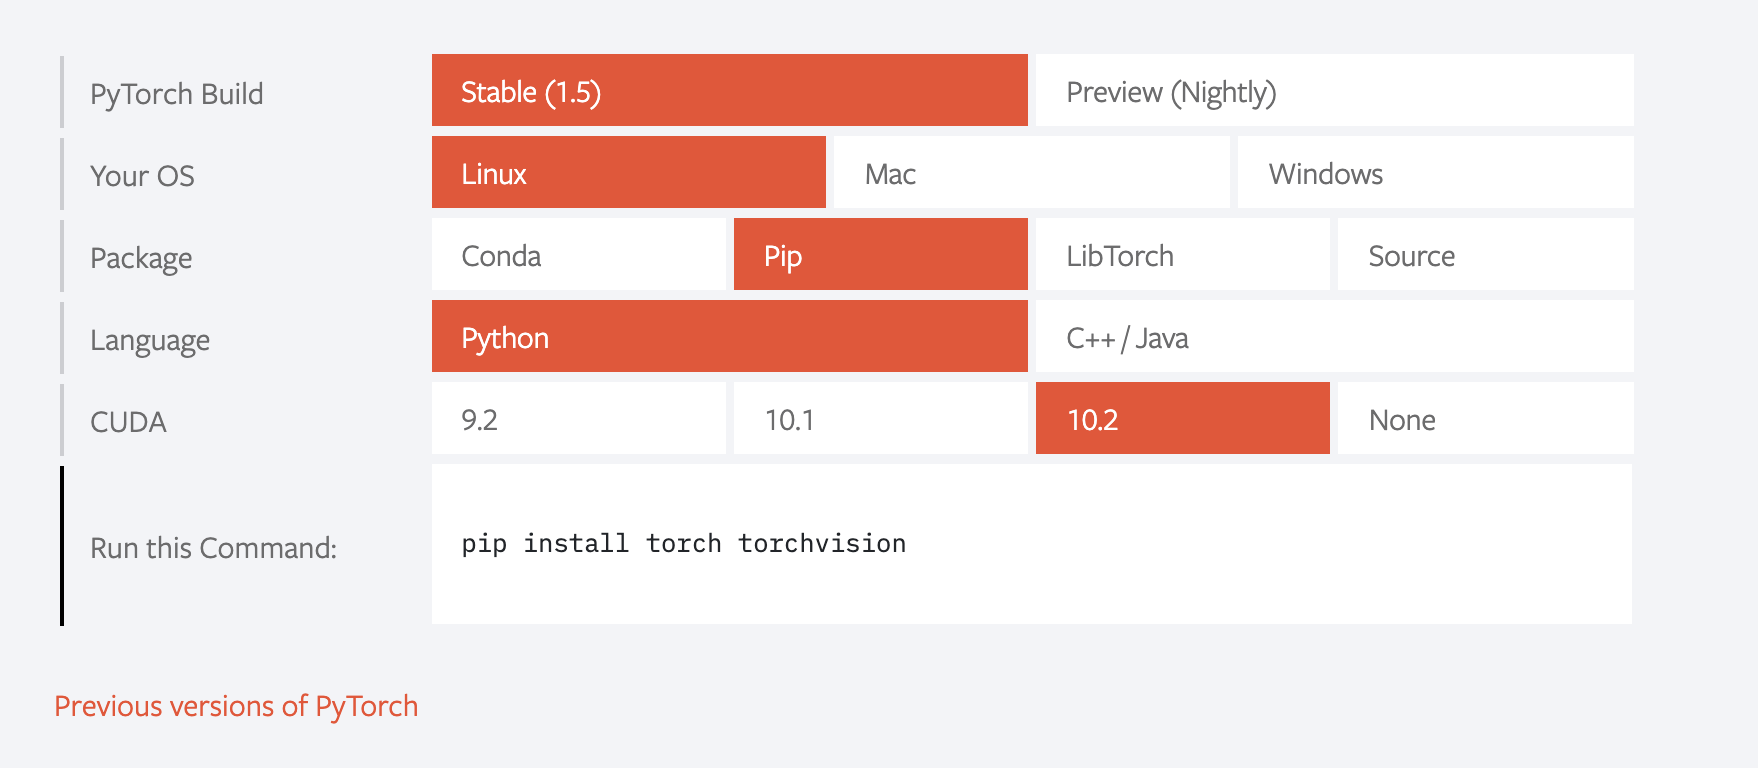
pytorch Install 随着新版本的退出,安装方式的指令存在变化,比如下图这样,在最新版式1.5.0的时候,使用pip install torch torchvision会安装pytorch1.5.0+cuda10.2,但是当最新版是1.4.0的时候这个命令就会安装pytorch1.4.0+cuda10.1,
推荐使用的安装方式是从https://download.pytorch.org/whl/torch_stable.html 或者 https://mirrors.tuna.tsinghua.edu.cn/anaconda/cloud/pytorch/linux-64这里找你想要的版本,然后使用
pip install https://download.pytorch.org/whl/cu101/torch-1.4.0-cp38-cp38-linux_x86_64.whl的方式安装你想要的历史版本。cu101/torch-1.4.0-cp38-cp38-linux_x86_64.whl这个的意思是cuda10.1+pytorch1.4.0+python3.8+linux的意思
训练加速 https://zhuanlan.zhihu.com/p/80695364
HDFS hdfs_io 主要实现对hdfs文件的读写等操作,使用管道的方式实现,HADOOP_BIN指向安装的hadoop路径,
1 2 3 4 5 6 7 8 9 10 11 12 13 14 15 16 17 18 19 20 21 22 23 24 25 26 27 28 29 30 31 32 33 34 35 36 37 38 39 40 41 42 43 44 45 46 47 48 49 50 51 52 53 54 55 56 57 58 59 60 61 62 63 64 65 66 67 68 69 70 71 72 73 74 75 76 77 78 79 80 81 82 83 84 85 86 87 88 89 90 91 92 93 94 95 96 97 98 99 100 101 102 103 104 105 106 107 108 109 110 111 112 113 114 115 116 117 118 119 120 121 122 123 124 125 126 127 128 129 130 131 132 133 134 135 136 137 138 139 140 141 142 143 144 145 146 147 148 149 150 151 152 153 154 155 156 157 158 159 160 161 162 163 164 165 166 167 168 169 170 171 172 173 174 175 176 177 178 179 180 181 182 183 184 185 186 187 188 189 from __future__ import print_function import glob import logging import os import shutil import subprocess import traceback from contextlib import contextmanager from typing import IO, Any head = '%(asctime)s - %(name)s - [%(process)d - %(levelname)s] :: [%(module)s|%(lineno)s] ==>> %(message)s' logging.basicConfig(format=head ) logger = logging.getLogger() logger.setLevel(logging.INFO) HADOOP_BIN = '/opt/tiger/yarn_deploy/hadoop/bin/hadoop' @contextmanager def hopen(hdfs_path, mode="r" ): pipe = None assert hdfs_path.startswith("hdfs" ), "HDFS is [{}], the prefix shuld be 'hdfs://' " .format(hdfs_path) if mode.startswith("r" ): pipe = subprocess.Popen( "{} fs -text {}" .format(HADOOP_BIN, hdfs_path), shell=True, stdout=subprocess.PIPE) yield pipe.stdout pipe.stdout.close() pipe.wait() return if mode == "wa" : pipe = subprocess.Popen( "{} fs -appendToFile - {}" .format(HADOOP_BIN, hdfs_path), shell=True, stdin=subprocess.PIPE) yield pipe.stdin pipe.stdin.close() pipe.wait() return if mode.startswith("w" ): pipe = subprocess.Popen( "{} fs -put -f - {}" .format(HADOOP_BIN, hdfs_path), shell=True, stdin=subprocess.PIPE) yield pipe.stdin pipe.stdin.close() pipe.wait() return raise RuntimeError("unsupported io mode: {}" .format(mode)) def hmerge(folders, dst, prefix="" , dedupe=False, **kwargs): nums = 0 all_files = hdfs_files(folders, prefix) logger.info("All files: {}" .format(all_files)) unique = {} with hopen(dst, mode="wa" ) as writer: try: for one in all_files: with hopen(one, mode="r" ) as reader: for line in reader: line = line.strip() if isinstance(line, bytes): line = line.decode('utf-8' ) if line: if dedupe: key = line.split("\t" )[0] if key not in unique: unique[key] = 1 msg = line + "\n" writer.write(msg.encode('utf-8' )) nums += 1 else : msg = line + "\n" writer.write(msg.encode('utf-8' )) nums += 1 if nums % 100 == 0: logger.info("Already write [{}] lines" .format(nums)) except: logger.error(traceback.format_exc()) pass def hlinenums(filepath, **kwargs): if not filepath.startswith("hdfs://" ): status, contents = subprocess.getstatusoutput("cat {} | wc -l" .format(filepath)) num = contents.replace(" " , "" ) return int(num) else : while 1: try: status, contents = subprocess.getstatusoutput("{} fs -text {} | wc -l" .format(HADOOP_BIN, filepath)) num = contents.replace(" " , "" ) if int(num) >= 0: return int(num) except: traceback.print_exc() pass def hexist(filepath, **kwargs): if not filepath.startswith("hdfs://" ): return os.path.exists(filepath) else : flage = subprocess.call("{} fs -test -e {}" .format(HADOOP_BIN, filepath), shell=True, stdin=subprocess.PIPE) return flage == 0 def hmkdir(filepath, **kwargs): if not filepath.startswith("hdfs://" ): os.makedirs(filepath, exist_ok=True) else : subprocess.call("{} fs -mkdir {}" .format(HADOOP_BIN, filepath), shell=True, stdin=subprocess.PIPE) def hcopy(src, dst, **kwargs): if not dst.startswith("hdfs://" ): shutil.copy(src, dst) else : subprocess.call("{} fs -copyFromLocal -f {} {}/" .format(HADOOP_BIN, src, dst), shell=True) def hisfile(filepath, **kwargs): if not filepath.startswith("hdfs://" ): return os.path.isfile(filepath) else : flage = subprocess.call("{} fs -test -d {}" .format(HADOOP_BIN, filepath), shell=True, stdin=subprocess.PIPE) if flage == 1: return hexist(filepath) return False def hisdir(filepath, **kwargs): if not filepath.startswith("hdfs://" ): return os.path.isdir(filepath) else : flage = subprocess.call("{} fs -test -d {}" .format(HADOOP_BIN, filepath), shell=True, stdin=subprocess.PIPE) return flage == 0 def hdelete(filepath, **kwargs): if not filepath.startswith("hdfs://" ): shutil.rmtree(filepath) else : subprocess.call("{} fs -rm -r {}" .format(HADOOP_BIN, filepath), shell=True, stdin=subprocess.PIPE) def hglob(search_path, sort_by_time=False): if search_path.startswith("hdfs" ): if sort_by_time: hdfs_command = HADOOP_BIN + ' fs -ls %s | sort -k6,7' % search_path else : hdfs_command = HADOOP_BIN + ' fs -ls %s' % search_path path_list = [] files = os.popen(hdfs_command).read () files = files.split("\n" ) for _file in files: if 'hdfs' in _file: startindex = _file.index('hdfs' ) path_list.append(_file[startindex:]) return path_list else : return glob.glob(search_path) def hdfs_files(folders, prefix="" ): files = [] for folder in folders: pipe = subprocess.Popen("{} fs -ls {}" .format(HADOOP_BIN, folder), shell=True, stdout=subprocess.PIPE) for line in pipe.stdout: line = line.strip() if len(line.split()) < 5: continue file_path = line.split()[-1].decode("utf8" ) if prefix: if prefix == os.path.splitext(file_path)[-1] or os.path.basename(file_path).startswith(prefix): files.append(file_path) else : files.append(file_path) pipe.stdout.close() pipe.wait() return files __all__ = ["hopen" , "hexist" , "hmerge" , "hdfs_files" , "hglob" , "hdelete" , "hisdir" , "hisfile" , "hcopy" , "hmkdir" , "hlinenums" ]
报错解决汇总 locale.Error: unsupported locale setting 解决方案
链接: https://stackoverflow.com/questions/36394101/pip-install-locale-error-unsupported-locale-setting
UnicodeDecodeError 这个是一大类的错误,顾名思义就是编码错误了,一版情况下是读取数据的时候读取错误造成的,比如说使用py2生成的文件,使用py3读取,因为py2的默认编码方式是unicode,而py3的默认编码方式是utf8,就很可能造成这个错误,解决方案
1
2
with open (filepath,"rb" ) as fi: xxx
关键就是使用rb方式打开文件,如果不添加打开方式或者使用`r的方式打开,会产生**’utf-8’ codec can’t decode byte 0x87 in position 0: invalid start byte**类似的错误。